Re: A tale of Rubí...PTE5862 .64 a/r Received, Head Rebuild
Posted: Sun May 19, 2013 9:29 am
by themagellan
Yup chasing 10+ hp instead of enjoying the car for the summer shouldn't take precedence.
Rubi is going to be nuts anyway the rest is built
Re: A tale of Rubí...PTE5862 .64 a/r Received, Head Rebuild
Posted: Sun May 19, 2013 11:17 am
by mushasho
I hear ya :x
Now it's a race to the finish... What's quicker?
a) Take head to more experienced shop with AAN heads and keep +.5mm plan. Or
b) Grab stock sized Supertechs from EFI and pop those in.
Either way looks like a week...
Sent from my HTC One using Tapatalk 2
Re: A tale of Rubí...PTE5862 .64 a/r Received, Head Rebuild
Posted: Sun May 19, 2013 1:39 pm
by PRY4SNO
IMO I'd run what ya brung. Try the other shop and it'll give you a reference for comparison when making future decisions between the two machinists.
Build is coming along nicely, kudos.
Re: A tale of Rubí...PTE5862 .64 a/r Received, Head Rebuild
Posted: Sun May 19, 2013 3:28 pm
by mushasho
PRY4SNO wrote:IMO I'd run what ya brung. Try the other shop and it'll give you a reference for comparison when making future decisions between the two machinists.
Build is coming along nicely, kudos.
Thanks and I'm probably gonna go that route...
In other news (to divert my attention and keep things going) I purchased a vital piece over the weekend...
uploadfromtaptalk1368995277461.jpg (63.72 KiB) Viewed 42072 times
Sent from my HTC One using Tapatalk 2
Re: A tale of Rubí...PTE5862 .64 a/r Received, Head Rebuild
Posted: Sun May 19, 2013 6:34 pm
by da_trem
Since your using OE pistons, did you end up reusing the circlips?..
Re: A tale of Rubí...PTE5862 .64 a/r Received, Head Rebuild
Posted: Sun May 19, 2013 6:51 pm
by mushasho
da_trem wrote:Since your using OE pistons, did you end up reusing the circlips?..
Re: A tale of Rubí...PTE5862 .64 a/r Received, Head Rebuild
Posted: Mon May 20, 2013 5:30 pm
by mushasho
After much deliberation with shop, we've concluded!!!
The only possible way to use cut OEM seats on a +.5mm valve is by cutting them in a way where they seal on the bottom ridge of the valve... We've arrived at this by looking at soo many 20vt valve jobs on the internet that had this set up...
Now in essence this is NOT optimal (for flow) as the the idea is to cut open the seat as to seal on the outer most ridge of the valve as opposed to slightly under. In fact he actually feels as the end result will not be that much of an improvement over a stock valve unless you get re-seated.
Re: A tale of Rubí...PTE5862 .64 a/r Received, Head Rebuild
Posted: Mon May 20, 2013 5:57 pm
by Hank
Your conclusion is sound, though the testing I have seen in the interwebs still shows a gain in flow with the seat lower. Ideally, the seats would be changed.
Re: A tale of Rubí...PTE5862 .64 a/r Received, Head Rebuild
Posted: Mon May 20, 2013 8:03 pm
by mushasho
I'm sure there's some improvement but he feels as though a stock port, stock size valve that's backcut like soo...
uploadfromtaptalk1369097573667.jpg (32.38 KiB) Viewed 42021 times
uploadfromtaptalk1369097559529.jpg (17.5 KiB) Viewed 42021 times
... would flow better as there's .5 less valve area the that air has to move around as the overall port isn't enlarged, just the seat perimeter. He recommends this with super light diy porting as the best combo.
In my case I will no longer be able to backcut the valves as that's where they will now meet on the cut OEM seat. As opposed to seating on the outer ridge coupled with a larger seat and port.
In other words anyone who's put a bigger valve on a stock cut seat has just put a bigger door on a the same sized opening just modified to close properly. And if any gain has been measured it's probably more because the OEM seats now sit lower creating a marginally larger opening when the valve is open.
Heck he even went as far as saying that some people don't even measure cfm on a forced induction car, they measure airspeed instead... So yeah, I'm chasing that 10hp dream...
Sent from my HTC One using Tapatalk 2
Re: A tale of Rubí...PTE5862 .64 a/r Received, Head Rebuild
Posted: Tue May 21, 2013 7:58 am
by themagellan
Just add +2PSI to your plan and call it a DAY
Re: A tale of Rubí...PTE5862 .64 a/r Received, Head Rebuild
Posted: Tue May 21, 2013 8:14 am
by mushasho
themagellan wrote:Just add +2PSI to your plan and call it a DAY
Not the same effect but I hear what you're saying....
The GOOD NEWS is that the shop called me just now...
Shop: "The hurdle faced on the exhaust side is not the case on the intake side."
Me: "ok"
Shop: "We were able to properly seat the intake valves on the outer most ridge of the valve as needed in hi-performance applications and in fact it seems as though someone at Ferrea knew something about this head design from the get."
Me: "Ok"
Shop: "The intake valves come backcut right out of the box as there is enough seating material on the OE seats for a proper cut and placement of the valve, where as the exhaust sides aren't as that material is needed for seating, so there will be no additional charge for backcutting""
Me: "Awesome"
Shop: "it'll be done later today"
Re: A tale of Rubí...PTE5862 .64 a/r Received, Head Rebuild
Posted: Tue May 21, 2013 12:54 pm
by themagellan
WOOOHOOO!! Let me know when the first turn key is so I can hold the camera
Re: A tale of Rubí...PTE5862 .64 a/r Received, Head Rebuild
Posted: Tue May 21, 2013 2:07 pm
by mushasho
This weeks To-do List:
Prep Bottom End by Further Cleaning/Wipe down Surfaces
Prep/Clean Rod Big end surfaces for Bearing Shell Install
Install Main Bearings
Install Crank
Torque Down Mains in OE Sequence
Attach Rods
Torque Rod Bolts
Install Oil Pick up Tube
Attach Pan Temporarily to keep lower end free from possible contaminants
Re: A tale of Rubí...PTE5862 .64 a/r Received, Head Rebuild
Looks good! Did you give any thought before to a DIY port n polish?
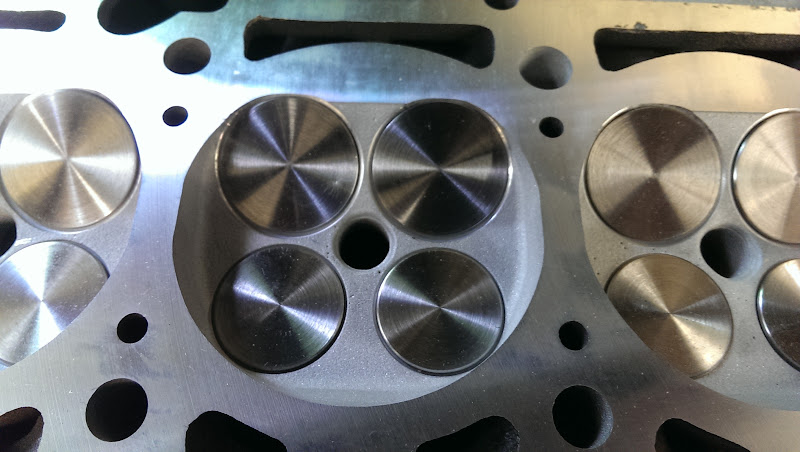
Re: A tale of Rubí...I've got my Head back!!!!
Posted: Wed May 22, 2013 2:56 pm
by Hank
Looks fantastic! Funny how fast adds up in a head!
Re: A tale of Rubí...I've got my Head back!!!!
Posted: Wed May 22, 2013 3:10 pm
by themagellan
that is a piece to be proud of, cannot wait to see this entire longblock in all it's glory.
Re: A tale of Rubí...I've got my Head back!!!!
Posted: Wed May 22, 2013 3:17 pm
by mushasho
S4Pirate wrote:Looks good! Did you give any thought before to a DIY port n polish?
Yes, yes I did...
The idea was to fully disassemble, port and polish then send to the shop with parts for the decking, flauxing, wash, new guides & assembly...While I was disassembling I battled going +.05mm in my head, I took it as far as removing the cams & lifters before I finally decided to go over size ... so I stopped there. I'm not sure I still wanna do a light PnP on it while it's half assembled,... What do you think?
Hank wrote:Looks fantastic! Funny how fast adds up in a head!
Thanks, yeah I'm a little over budget, but who isn't on any build that's done with love... Good news is that most of whats left is just labor... Most big ticket items have been purchased... Now it's little sensors, belts, gaskets, water pump, belt, t-stat, non detergent oil, wire up my meth pump, tap into my windshield washer & possibly tranny and motor mounts depending on how they look ect...
Oh and I'm also getting the itch to upgrade my Deka 630cc, but I'm sure that can wait until after break IN...
themagellan wrote:that is a piece to be proud of, cannot wait to see this entire longblock in all it's glory.
Yeah I'm really happy, specially with the level of communication & professionalism from this shop when faced with the 20vt challenges. I'm super glad to see how free of cracks this head is too...
I might do a before & after using stock AAN cams first then swapping them out to see how much spool I lose...
( thoughts in my head)
Re: A tale of Rubí...I've got my Head back!!!!
Posted: Wed May 22, 2013 4:25 pm
by 4v6
Looks like its been blast cleaned?
Dry Soda perhaps?
If its been done with anything else make sure you check the oil galleries that run either side of the head and that feed the hydros- you dont want any media left in there i can tell you!
Blow them out with an air line (mind your eyes!) and see what comes out, theres usually grungy residue of some sort which i get out with carb cleaner as much as possible.
Dosnt matter so much about soda as it dissolves in oil.
Re: A tale of Rubí...I've got my Head back!!!!
Posted: Wed May 22, 2013 5:13 pm
by S4Pirate
mushasho wrote:
Yes, yes I did...
The idea was to fully disassemble, port and polish then send to the shop with parts for the decking, flauxing, wash, new guides & assembly...While I was disassembling I battled going +.05mm in my head, I took it as far as removing the cams & lifters before I finally decided to go over size ... so I stopped there. I'm not sure I still wanna do a light PnP on it while it's half assembled,... What do you think?
You're basically ahead of me by 2 weeks. I plan on porting and polishing myself and then sending to the machine shop for oversized valves. I'm doing it beforehand so he can clean up the mess I'll make. I'm not sure you want to do that with everything assembled but others would know better than I.
Re: A tale of Rubí...I've got my Head back!!!!
Posted: Thu May 23, 2013 4:49 am
by 4v6
mushasho wrote:
S4Pirate wrote:Looks good! Did you give any thought before to a DIY port n polish?
Yes, yes I did...
The idea was to fully disassemble, port and polish then send to the shop with parts for the decking, flauxing, wash, new guides & assembly...While I was disassembling I battled going +.05mm in my head, I took it as far as removing the cams & lifters before I finally decided to go over size ... so I stopped there. I'm not sure I still wanna do a light PnP on it while it's half assembled,... What do you think?
Unless you remove the valves to access the short radius area on the exhaust side any work elsewhere will do nothing much really.
You cant really do much to the guide bosses on the intakes with the guides installed as you risk knocking them about with any tooling, probably best to run it as is.
Re: A tale of Rubí...I've got my Head back!!!!
Posted: Thu May 23, 2013 9:53 am
by mushasho
I'm just gonna clean the heck out of this one and see how it goes... I'll have a spare I could go nuts on if need be... but most likely not... I'll probably devote my future efforts on something 07k
Re: A tale of Rubí...I've got my Head back!!!!
Posted: Thu May 23, 2013 11:22 am
by ringbearer
It's funny how an 07k costs less than the parts for the head build
Can't wait to see one in a UrS!
Find that avant shell Hank
Re: A tale of Rubí...I've got my Head back!!!!
Posted: Thu May 23, 2013 11:31 am
by mushasho
ringbearer wrote:It's funny how an 07k costs less than the parts for the head build
Can't wait to see one in a UrS!
Find that avant shell Hank
Seriously though... I'm about to pick up another b5 Avant Shell to do and 07k swap... I want to wait and see if a swap can be done with the 07k wiring and all to meet Massachusetts OBD2 emissions req... most of the swap taking place here are into older bodies that don't require these tests here... An Allroad 07k Swap would be even nicer...
Re: A tale of Rubí...I've got my Head back!!!!
Posted: Thu May 23, 2013 12:17 pm
by ringbearer
I'd have to pass CA emissions and that takes the fun out of it