And LOL @ hank finger banging your car to climax hahah I wish someone would have video taped that.
Justin's '85 UrQ'd 4000 20vt Project - Tuning Help?
Re: Justin's '85 4000 20vt Project: Got sex'd by an UrQ?
LOL @ all of those binder clips.
And LOL @ hank finger banging your car to climax hahah I wish someone would have video taped that.
And LOL @ hank finger banging your car to climax hahah I wish someone would have video taped that.
Ed
Re: Justin's '85 4000 20vt Project: Got sex'd by an UrQ?
The binder clips were def a sight to see... and I did pull out my iPhone to capture him "working it" as well as the noises coming from the car... but then decided since he was kind enough to help out, I didn't want to embarass him too badly 

Re: Justin's '85 4000 20vt Project: Got sex'd by an UrQ?
Oh man, you were telling me what a pain the headliner was to get in and I couldn't figure out why it was so bad, but now that I see pics I totally understand, that looks like an absolute pain in the ass! 
Everything looks great though, I'm really impressed!
Everything looks great though, I'm really impressed!
-Shawn C.
2001 S4 6spd Avant blk/blk - stock daily
2002 01E B6 A4 Built FYF, Built 1.8T, HX35 ~330whp
1989 MC-1 200 Avant- MS1 -Gone but will never forget her lessons
1987 5ktq Sedan - Best $500 beater ever
2001 S4 6spd Avant blk/blk - stock daily
2002 01E B6 A4 Built FYF, Built 1.8T, HX35 ~330whp
1989 MC-1 200 Avant- MS1 -Gone but will never forget her lessons
1987 5ktq Sedan - Best $500 beater ever
Re: Justin's '85 UrQ'd 4000 20vt Project
So it's been a while since I've updated this thread, and catch everything back up to date.
After May last year, and the "starting fluid episode" I was in need of an new intercooler.
As I mentioned previously, I decided to ditch the thinner Saab unit (with plastic endtanks) and upgrade to a full metal intercooler. I didn't necessarily have the coin to drop on a more efficient unit, so I got the tried/true ebay IC and started in on making it "work."
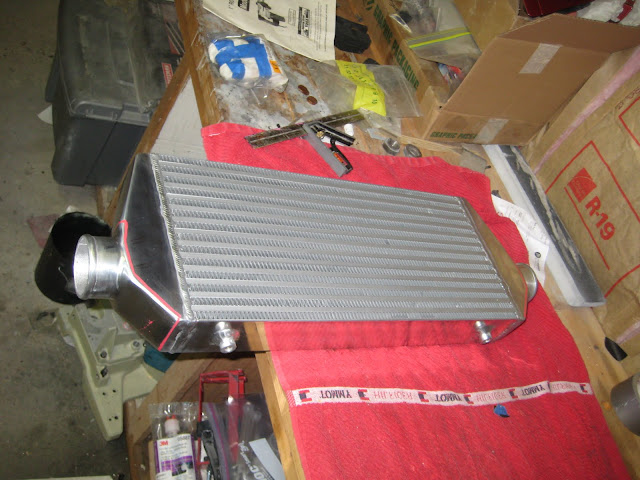
after a little loving w/ my die grinder and a jig saw, we were starting to get somewhere:

Being that this was a 2.5" thick core vs the 1.5" core I had previously, things were a bit tighter on the engine side than before...

Once I got my measurements, I knew how wide I could go with the entire unit, and I started to fab up new end tanks:


Little more cutting, little more trimming, little more fitting:

and all tacked together w/ my spool gun for my MIG welder:

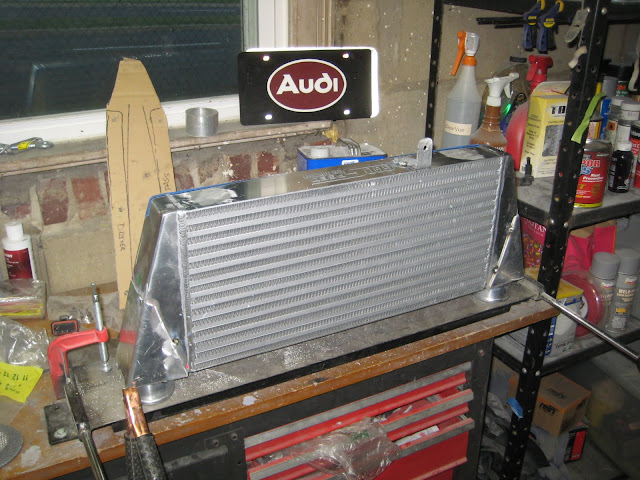
FWIW, while in theory it'll work great, welding AL with a spool gun is def not an easy feat. I'm sure with a lot more practice I could make prettier/more functional welds, but man... what a pain!
This is about as good of a weld as I could do when practicing, and it's for this reason that I found someone w/ a TIG welder to finish up everything! I didn't want my IC to look like complete shicahcah!

Additionally, I wasn't able to get enough heat into the weld that it was giving me full penetration, so I feared that it would blow apart eventually under constant abuse.
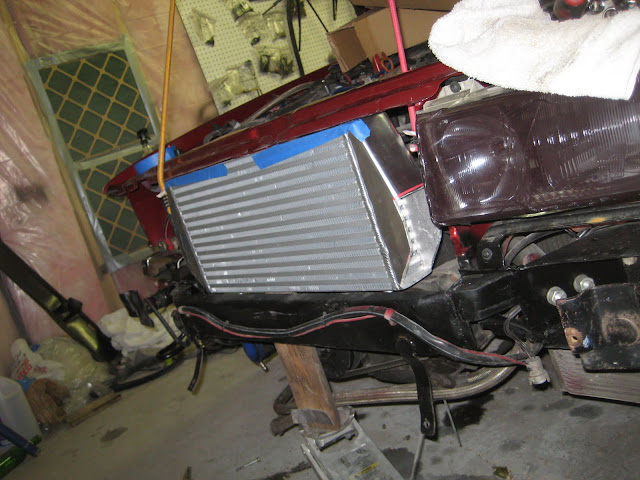
After coming back from the first TIG welder, this was the initial setup:
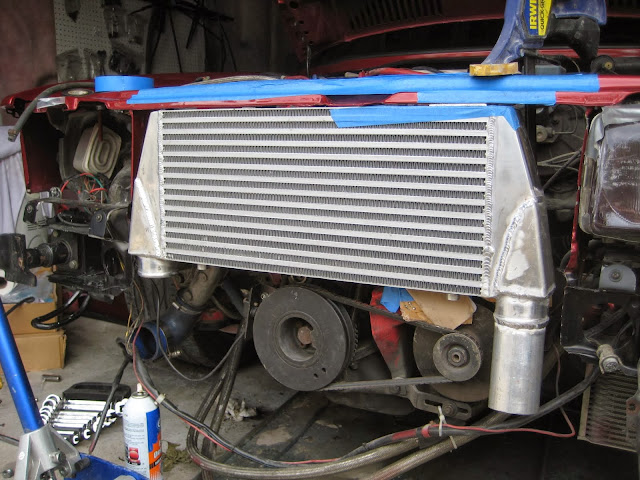
As I mentioned before, this IC is a fair bit bigger than my original, and I didn't really design my bumpers, core support, etc to support a bigger IC... so things were TIGHT
His welds were a LOT prettier than mine, btw

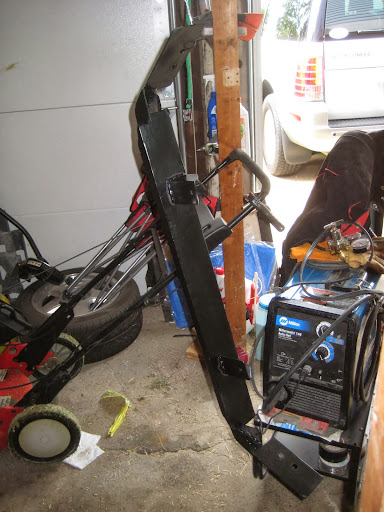
Once I got the IC roughed in place, I went to adding mounts to my core support to fasten everything down:

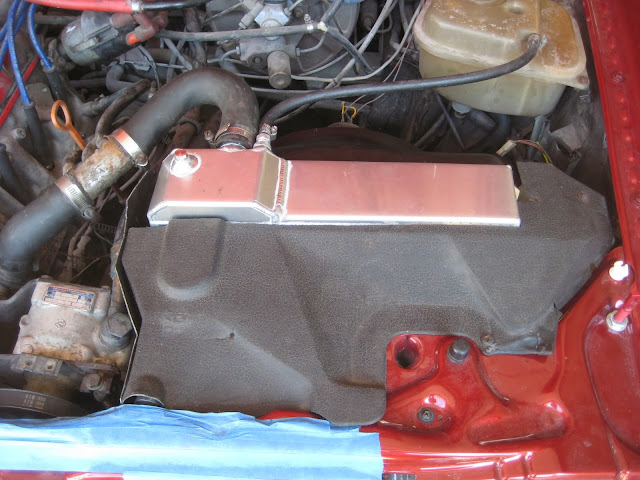
and then after a trip to another TIG welder (this one was closer than the last, hence 2 different welders) to weld on one more pipe and to finish up the bottom pipe for my BOV, it was time to make everything pretty with a little wrinkle coating!

This was my first time using this stuff, and it actually came out fairly nicely FWIW...

and everything installed back in the car:

Things were tight for sure, but the car survived 2 track events and a fair bit of miles and experienced no contact what-so-ever. So that was a relief at least.
The next thing that was up to upgrade was the radiator as well. On the really hot track days, my coolant temps would get a bit higher than I liked, and I generally needed to run the heater in the car (insult to injury) to keep everything under control. In order to combat this, I was able to get a custom radiator built (for a fair bit cheaper than the Ron Davis ones 034 sells):


As you can see, this one is a fair bit thicker than the OEM, giving me a bit mroe capacity, etc. Only downside to this one over the 034 radiator is that I had to add threaded inserts for the fan shroud mounts, etc. Not the end of the world, and very worth the savings IMHO, but one downside.
And with the nice shiny new radiator, I of course needed to clean up the shroud that was weathered and slightly rusty:

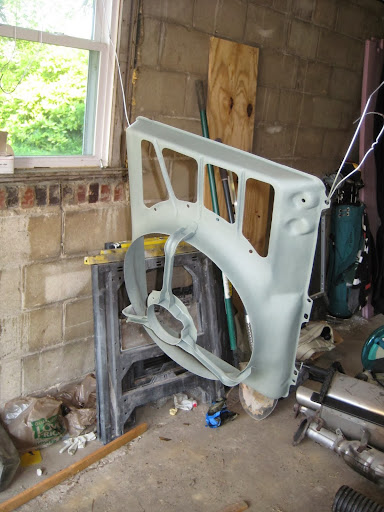

and with some trimming and adjusting, everything popped right into place (including my custom side shrouds to the radiator)

At this point, the 'ol girl made it to three track events. It made its track debue at Watkins Glen II in August. The tune was far from ideal, but she ran. Car was loud as anything w/ the temporary summit point $25 resonator welded onto the exhaust (to the point I needed earplugs on the way up/back), but it made it there w/o a hitch!
Unfortunately, life at the track wasn't too great b/c teh improved design 034 trigger wheel failed on the second run of the day, leaving me with 5 of 6 screws sheered off.

Thankfully, sun does shine on a dog's a$$ every now and again, and I was able to find a full on machine shop in Watkins Glen with CNC machines and the whole 9 yards. After talking with the owner for a bit and acting truly pathetic and hopeless, he put aside what he was doing and helped me drill and retap the holes. Additionally, there was a hardware store in town that stocked 3mm screws as well... I struck gold for sure.
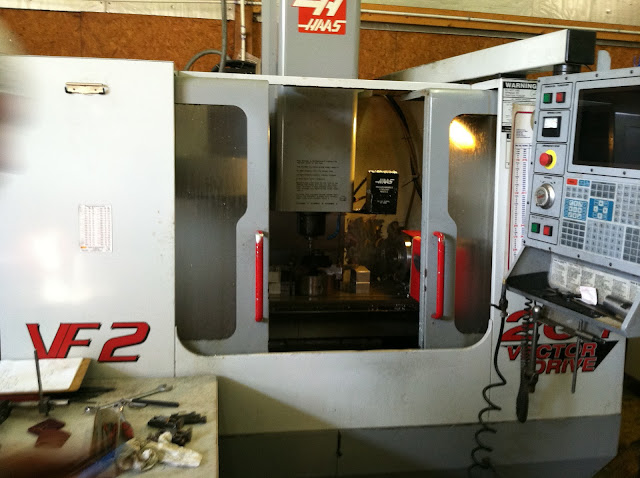
Needless to say, this is not the site people are used to in the paddock garages:
I had it apart at 4pm on Monday, and had it back together first thing Tuesday morning in time for the first instructor session... so I was over the moon excited to get the 'ol girl back on track again.
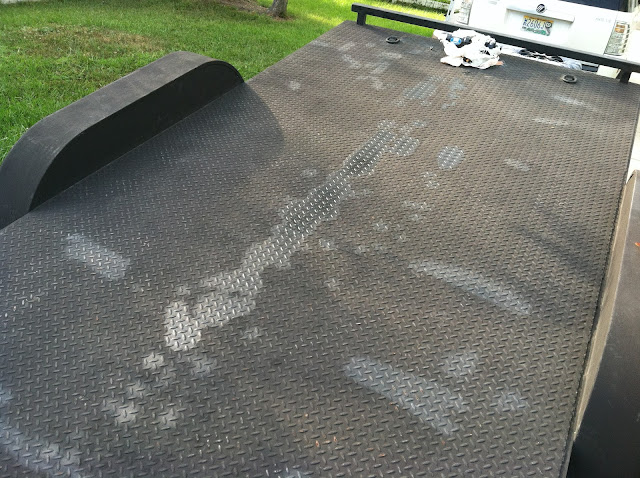
Unfortunately the event didn't end w/o issues, as the rear seal on the center diff let go and started spraying transmission fluid all over my exhaust. It was at that point we tossed in the towel and I swapped spots with my dad's car and ended up towing the 'ol girl home...

we had a bleeder!
but after some time under the car (having Wiley's old 016 trans w/ high bias center diff in my garage) and with Wiley's help, we were able to toss the new center diff on my transmission and get it all buttoned up. From there, I was able to take the 'ol bird out for two more events, one in Summit Point and one at VIR. Car performed well. I really need to tune it properly and get more boost thrown in, but for now she's happy with her younger siblings

I think this pretty much catches me up to date. Have some things to do over the winter to finish buttoning up the car (namely powdercoating trim, finish installing interior, fix WG bolts that backed out, etc), but hopefully I can get out in March for what may be my last event for a while, as the family is about to grow by one!
After May last year, and the "starting fluid episode" I was in need of an new intercooler.
As I mentioned previously, I decided to ditch the thinner Saab unit (with plastic endtanks) and upgrade to a full metal intercooler. I didn't necessarily have the coin to drop on a more efficient unit, so I got the tried/true ebay IC and started in on making it "work."
after a little loving w/ my die grinder and a jig saw, we were starting to get somewhere:
Being that this was a 2.5" thick core vs the 1.5" core I had previously, things were a bit tighter on the engine side than before...
Once I got my measurements, I knew how wide I could go with the entire unit, and I started to fab up new end tanks:
Little more cutting, little more trimming, little more fitting:
and all tacked together w/ my spool gun for my MIG welder:
FWIW, while in theory it'll work great, welding AL with a spool gun is def not an easy feat. I'm sure with a lot more practice I could make prettier/more functional welds, but man... what a pain!
This is about as good of a weld as I could do when practicing, and it's for this reason that I found someone w/ a TIG welder to finish up everything! I didn't want my IC to look like complete shicahcah!
Additionally, I wasn't able to get enough heat into the weld that it was giving me full penetration, so I feared that it would blow apart eventually under constant abuse.
After coming back from the first TIG welder, this was the initial setup:
As I mentioned before, this IC is a fair bit bigger than my original, and I didn't really design my bumpers, core support, etc to support a bigger IC... so things were TIGHT
His welds were a LOT prettier than mine, btw
Once I got the IC roughed in place, I went to adding mounts to my core support to fasten everything down:
and then after a trip to another TIG welder (this one was closer than the last, hence 2 different welders) to weld on one more pipe and to finish up the bottom pipe for my BOV, it was time to make everything pretty with a little wrinkle coating!
This was my first time using this stuff, and it actually came out fairly nicely FWIW...
and everything installed back in the car:
Things were tight for sure, but the car survived 2 track events and a fair bit of miles and experienced no contact what-so-ever. So that was a relief at least.
The next thing that was up to upgrade was the radiator as well. On the really hot track days, my coolant temps would get a bit higher than I liked, and I generally needed to run the heater in the car (insult to injury) to keep everything under control. In order to combat this, I was able to get a custom radiator built (for a fair bit cheaper than the Ron Davis ones 034 sells):
As you can see, this one is a fair bit thicker than the OEM, giving me a bit mroe capacity, etc. Only downside to this one over the 034 radiator is that I had to add threaded inserts for the fan shroud mounts, etc. Not the end of the world, and very worth the savings IMHO, but one downside.
And with the nice shiny new radiator, I of course needed to clean up the shroud that was weathered and slightly rusty:
and with some trimming and adjusting, everything popped right into place (including my custom side shrouds to the radiator)
At this point, the 'ol girl made it to three track events. It made its track debue at Watkins Glen II in August. The tune was far from ideal, but she ran. Car was loud as anything w/ the temporary summit point $25 resonator welded onto the exhaust (to the point I needed earplugs on the way up/back), but it made it there w/o a hitch!
Unfortunately, life at the track wasn't too great b/c teh improved design 034 trigger wheel failed on the second run of the day, leaving me with 5 of 6 screws sheered off.
Thankfully, sun does shine on a dog's a$$ every now and again, and I was able to find a full on machine shop in Watkins Glen with CNC machines and the whole 9 yards. After talking with the owner for a bit and acting truly pathetic and hopeless, he put aside what he was doing and helped me drill and retap the holes. Additionally, there was a hardware store in town that stocked 3mm screws as well... I struck gold for sure.
Needless to say, this is not the site people are used to in the paddock garages:
I had it apart at 4pm on Monday, and had it back together first thing Tuesday morning in time for the first instructor session... so I was over the moon excited to get the 'ol girl back on track again.
Unfortunately the event didn't end w/o issues, as the rear seal on the center diff let go and started spraying transmission fluid all over my exhaust. It was at that point we tossed in the towel and I swapped spots with my dad's car and ended up towing the 'ol girl home...
we had a bleeder!
but after some time under the car (having Wiley's old 016 trans w/ high bias center diff in my garage) and with Wiley's help, we were able to toss the new center diff on my transmission and get it all buttoned up. From there, I was able to take the 'ol bird out for two more events, one in Summit Point and one at VIR. Car performed well. I really need to tune it properly and get more boost thrown in, but for now she's happy with her younger siblings
I think this pretty much catches me up to date. Have some things to do over the winter to finish buttoning up the car (namely powdercoating trim, finish installing interior, fix WG bolts that backed out, etc), but hopefully I can get out in March for what may be my last event for a while, as the family is about to grow by one!

Re: Justin's '85 UrQ'd 4000 20vt Project
Holy crap man, the car looks fantastic. You know what I think though? This thing needs an 07k or AAN... ASAP!
-Ben-

-1985 Audi 4kq: Xona 7164 AAN 488whp- -2009 Audi A4 -
-1985 Audi 4kq: Xona 7164 AAN 488whp- -2009 Audi A4 -
-
audifreakjim

- Posts: 2145
- Joined: Sun Mar 03, 2013 3:00 pm
Re: Justin's '85 UrQ'd 4000 20vt Project
Love this car, nice update. Did you have a local shop build that Radiator for you? I need a new one. My Ron Davis finally started leaking..
Re: Justin's '85 UrQ'd 4000 20vt Project
Lol, Ben... thoughts have crossed my mind, but $$ is not there. I have an AAN that's in need of a rebuild that I could toss in the car, but honestly... if I get the 20vt tuned right, it really will have all the power I'd want/need. Maybe one day, but alas life and growing family are taking priority. That and my 90 yr old home is bleeding me dry trying to update/fix it up!
Jim - I had a buddy in upstate NY source it from a guy he knows. Not sure if they're up for/willing for another, unfortunately... I can ask if you want, PM me.
Jim - I had a buddy in upstate NY source it from a guy he knows. Not sure if they're up for/willing for another, unfortunately... I can ask if you want, PM me.

Re: Justin's '85 UrQ'd 4000 20vt Project
me too! depending on cost (radiator)
Matt
18 Silverado 1500 work pig, roof rack and tonneau cover
11 Jetta sedan TDI DSG, rear muffler delete
GONE :( 87 4ktq - 4 FOX SNAKES

18 Silverado 1500 work pig, roof rack and tonneau cover
11 Jetta sedan TDI DSG, rear muffler delete
GONE :( 87 4ktq - 4 FOX SNAKES
Re: Justin's '85 UrQ'd 4000 20vt Project
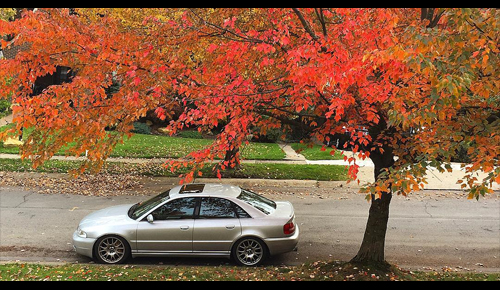
Using her how she was intended to be used

Had our (PCC-ACNA) spring opener on Summit Point Main this past weekend. Car (with 2.2Bar spring) ran happily - though I'm only seeing 12 psi of boost. Thinking the "adjustable WG cap" I have is turned down too much so it's limiting the ability of the spring, but not sure. REgardless, car was peppy, tune was adequate, and overall was a great day to be on the track!
Only issue is starter doesn't turn anymore (needs push starts), so need to diagnose that. Think it was the car yelling at me for looping it going into T5 :-P
Re: Justin's '85 UrQ'd 4000 20vt Project
Car looks great man! I'm really glad that after all the hard work you put into this beast you're still out beating on it. Big thumbs up!
-Ben-
-1985 Audi 4kq: Xona 7164 AAN 488whp- -2009 Audi A4 -
-1985 Audi 4kq: Xona 7164 AAN 488whp- -2009 Audi A4 -
Re: Justin's '85 UrQ'd 4000 20vt Project
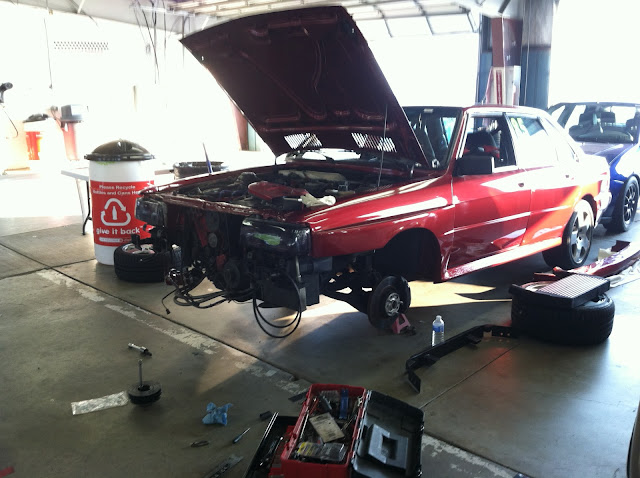
I guess it's been a bit since I've updated!
So after the summit point event at the end of march, the car stayed under a cover in my garage until August (my wife and I had our first child early April!).
In August, I decided to tackle a few things that I haven't bothered touching since assembling the car last year, but had every intent of doing. Since I made the venture up to Watkins Glen mid August, I figured I'd check a few things off the list.
This wasn't anything "super special," but was something I wanted to do to help stealth the car out a little more... tinting the tails!
Sanded down all the pieces, removing the raised stamps, etc on the lights:

And mixed up a brew of clear coat and black paint:
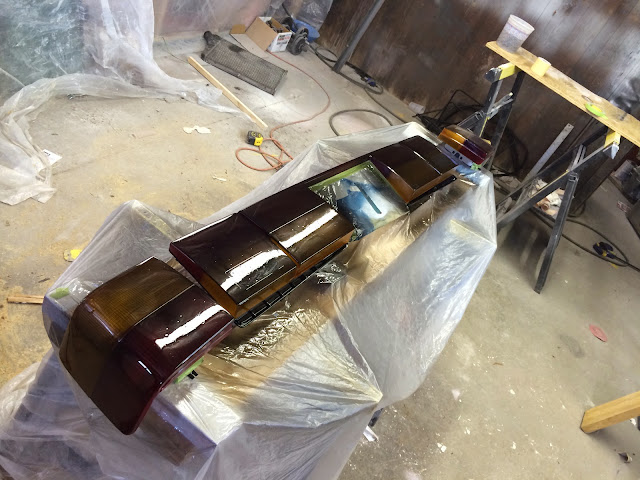
Unforunately, there are a few blemishs due to water drops (I'm assuming) getting past the filter/separator on my aircompressor, so I need to do more wet sanding and polishing. This was progress in August, I've been tinkering with them on/off since. I can say, I've been having a helluva time getting a nice smooth coat of the tinted clear on them w/o running... but what have ya.
Installed!


and while I was at it, I also added the same tint film I have on the headlights to the bumper blinkers as well...

I also sprayed the side markers for the bumper, but I had a hard time getting decent coverage (i.e. the tinted clear would slowly run off to the sides since the surfaces were so small). Still need to address this issue.
It was fun having it up at WG again though!
Currently all the window surround trim plus the rain gutters are at the powder coater getting blasted and baked w/ a satin black powder. I need to get the bottom window scrapers, and then I can finish off the exterior of the car.
I then need to finish reassembling the interior, but have been triyng to decide if I want to recover my door cards vs. just putting them back in.
AND MOST IMPORTANTLY... I need to get this thing tuned. I have a 2.2bar spring in, and I'm only seeing 12psi right now. Initial boost leak test didn't show me any leaks. Need to check a few more things before I give up. Hoping to get it on a dyno eventually, but the old house plus now 6month old are taking up a lot of my time and funds.
So after the summit point event at the end of march, the car stayed under a cover in my garage until August (my wife and I had our first child early April!).
In August, I decided to tackle a few things that I haven't bothered touching since assembling the car last year, but had every intent of doing. Since I made the venture up to Watkins Glen mid August, I figured I'd check a few things off the list.
This wasn't anything "super special," but was something I wanted to do to help stealth the car out a little more... tinting the tails!
Sanded down all the pieces, removing the raised stamps, etc on the lights:
And mixed up a brew of clear coat and black paint:
Unforunately, there are a few blemishs due to water drops (I'm assuming) getting past the filter/separator on my aircompressor, so I need to do more wet sanding and polishing. This was progress in August, I've been tinkering with them on/off since. I can say, I've been having a helluva time getting a nice smooth coat of the tinted clear on them w/o running... but what have ya.
Installed!
and while I was at it, I also added the same tint film I have on the headlights to the bumper blinkers as well...
I also sprayed the side markers for the bumper, but I had a hard time getting decent coverage (i.e. the tinted clear would slowly run off to the sides since the surfaces were so small). Still need to address this issue.
It was fun having it up at WG again though!
Currently all the window surround trim plus the rain gutters are at the powder coater getting blasted and baked w/ a satin black powder. I need to get the bottom window scrapers, and then I can finish off the exterior of the car.
I then need to finish reassembling the interior, but have been triyng to decide if I want to recover my door cards vs. just putting them back in.
AND MOST IMPORTANTLY... I need to get this thing tuned. I have a 2.2bar spring in, and I'm only seeing 12psi right now. Initial boost leak test didn't show me any leaks. Need to check a few more things before I give up. Hoping to get it on a dyno eventually, but the old house plus now 6month old are taking up a lot of my time and funds
-
audifreakjim
- Posts: 2145
- Joined: Sun Mar 03, 2013 3:00 pm
Re: Justin's '85 UrQ'd 4000 20vt Project
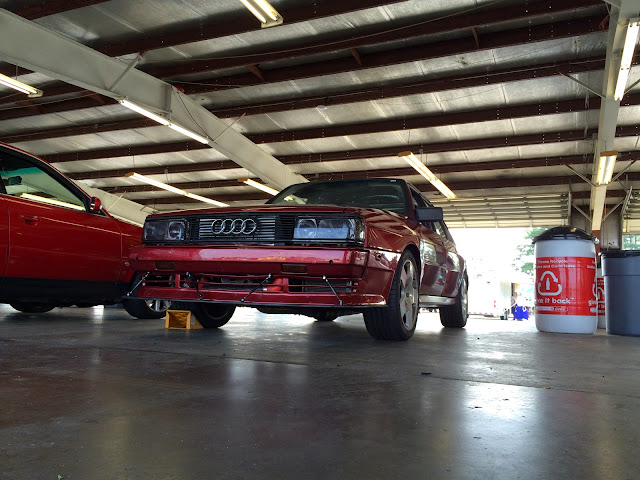
Love this car. I really want to get a splitter on the front. Can you tell any difference?
Re: Justin's '85 UrQ'd 4000 20vt Project
Thanks, Jim!audifreakjim wrote:Love this car. I really want to get a splitter on the front. Can you tell any difference?
I have to admit, the car likes to turn now
I don't push the car like I used, moreso b/c the tune sucks and the car bucks/stutters around sharp corners, but it does handle amazingly, and I attribute part of that to the splitter.
Eventually I'm going to design a spoiler for the trunk too, but that's down the road when I have more time.
Re: Justin's '85 UrQ'd 4000 20vt Project
What ever happened to this? Did you relocate the IAT sensor with the bung I made for you?
"If you can't find one, make one"
Dallastown, PA
1991 Audi 80 quattro (20vt project)
1991 Audi Coupe Quattro (project: my first 20v)
2007 Mitsubishi Raider(Dakota in disguise)
2019 Chevy Cruze RS hatch (wife's little red sporty car)
Dallastown, PA
1991 Audi 80 quattro (20vt project)
1991 Audi Coupe Quattro (project: my first 20v)
2007 Mitsubishi Raider(Dakota in disguise)
2019 Chevy Cruze RS hatch (wife's little red sporty car)
Re: Justin's '85 UrQ'd 4000 20vt Project
She's alive and kicking! Though collecting dust since March :(
I was able to put in the bung you made for me and relocate the IAT. I even managed to weld it in myself w/ my MIG spool gun, though I had the heat up a little high and melted it some! Still trying to perfect the AL welding gig. That being said, while not pretty - it wasn't going anywhere!
I had the car out to Summit Point for our opening PCC-ACNA track day on the Main circuit. Car ran ok, though I have a hesitation/hiccup around turns that I have to hunt down. Happened ever since I put in the Ic ECU, and it's driving me nuts. Not sure if it's a bad tune or a frayed wire. It gets progressively worse as the car gets hotter, and happens around right hand turns mostly - so I'm thinking more wiring issue at this point. It's essentially an ignition cut, as my friend following me told me it's puffing black smoke out the back when it happens... so it's not a fuel cut out.
Some pictures from the event though:


I also need to get it on the rollers and get it properly tuned. Was trying to work w/ a buddy that's just outside of Pittsburg, but our schedules just aren't meshing right now. I have it at 18psi, where it's running OK, but I want to turn on the N75/boost control and get it up to 25psi or so. I have some friends in the instructor group I need to terrorize more, and I need to make up for the fact I dont' have r-comps by drag racing them more down the straights
I was able to put in the bung you made for me and relocate the IAT. I even managed to weld it in myself w/ my MIG spool gun, though I had the heat up a little high and melted it some! Still trying to perfect the AL welding gig. That being said, while not pretty - it wasn't going anywhere!
I had the car out to Summit Point for our opening PCC-ACNA track day on the Main circuit. Car ran ok, though I have a hesitation/hiccup around turns that I have to hunt down. Happened ever since I put in the Ic ECU, and it's driving me nuts. Not sure if it's a bad tune or a frayed wire. It gets progressively worse as the car gets hotter, and happens around right hand turns mostly - so I'm thinking more wiring issue at this point. It's essentially an ignition cut, as my friend following me told me it's puffing black smoke out the back when it happens... so it's not a fuel cut out.
Some pictures from the event though:
I also need to get it on the rollers and get it properly tuned. Was trying to work w/ a buddy that's just outside of Pittsburg, but our schedules just aren't meshing right now. I have it at 18psi, where it's running OK, but I want to turn on the N75/boost control and get it up to 25psi or so
Re: Justin's '85 UrQ'd 4000 20vt Project - Tuning Help?
Alright folks, I need some advice here...
ECU is a Ic ECU.
As I've posted about plenty of times, I keep getting random cut outs with my car between 3k and 5500 rpm... sporadically. It gets worse as the car gets warmer, and when on the track it's more prominent around sweeping right hand turns (think toe of boot at watkins, T11, etc.). It's frustrating to say the least!
Well, last night I decided to take the 'ol bird out for a spin and run a few logs. When looking it over, I'm not seeing anything jumping out at me saying it's off, but then again - I'm not sure how good my timing is (openly willing to say: I have no clue where it should be, etc. as I normally mess with fuel tables). When I look at my trigger, it stays rock solid at 59 and doesn't move. For the log, ignore the A/F readings, as I have it hooked up to my zetronix unit, but I haven't figured out how to calibrate it properly. They run off a 5v setup vs. the LC1 1v setup, and despite help from 'The Architect' a few years back installing resistors, I'm still not able to get it reading the same as the unit in the car. When the car is cutting out, it's on the slightly rich side, but it's not lean by any means. I have it running fairly fat right now at around 11.5:1 at 18psi.
I attached the log for viewing pleasure. I also pulled plugs to see what they looked like, but I have zero idea how to read them. They look clean, though the plug from Cyl 1 looked to have a couple deposits on it, so I'm worried a little that I'm getting some detonation.
cyl 1:

cyl 2:

cyl 3:

cyl 4:

cyl 5:

Another thing it's doing that's strange is that my boost is fluctuating. I had it consistently at 18psi (2.2 bar spring), but at the glen it was slowly creeping up to 20ish psi. So I backed my WG bolt back slightly, and then noticed that I'd hear surging as I was going down the straights and it'd go b/n 16-18 psi (it's a GT2871 turbo, so I'm far from pushing it's capabilities at that pressure). When I took it out last night, I hit 23psi w/ the same setting I had before.... so things are going screwy here!
I'm heading down to Dominion Raceway to run with the Audi club this weekend, so hoping to potentially tinker with some of this while I'm there and get it running a little better... if the radiator holds up. My swanky custom AL radiator has started to leak. Apparently it wore out from sitting, as I'm lucky if I've put 5k miles on it since installing it....
ECU is a Ic ECU.
As I've posted about plenty of times, I keep getting random cut outs with my car between 3k and 5500 rpm... sporadically. It gets worse as the car gets warmer, and when on the track it's more prominent around sweeping right hand turns (think toe of boot at watkins, T11, etc.). It's frustrating to say the least!
Well, last night I decided to take the 'ol bird out for a spin and run a few logs. When looking it over, I'm not seeing anything jumping out at me saying it's off, but then again - I'm not sure how good my timing is (openly willing to say: I have no clue where it should be, etc. as I normally mess with fuel tables). When I look at my trigger, it stays rock solid at 59 and doesn't move. For the log, ignore the A/F readings, as I have it hooked up to my zetronix unit, but I haven't figured out how to calibrate it properly. They run off a 5v setup vs. the LC1 1v setup, and despite help from 'The Architect' a few years back installing resistors, I'm still not able to get it reading the same as the unit in the car. When the car is cutting out, it's on the slightly rich side, but it's not lean by any means. I have it running fairly fat right now at around 11.5:1 at 18psi.
I attached the log for viewing pleasure. I also pulled plugs to see what they looked like, but I have zero idea how to read them. They look clean, though the plug from Cyl 1 looked to have a couple deposits on it, so I'm worried a little that I'm getting some detonation.
cyl 1:
cyl 2:
cyl 3:
cyl 4:
cyl 5:
Another thing it's doing that's strange is that my boost is fluctuating. I had it consistently at 18psi (2.2 bar spring), but at the glen it was slowly creeping up to 20ish psi. So I backed my WG bolt back slightly, and then noticed that I'd hear surging as I was going down the straights and it'd go b/n 16-18 psi (it's a GT2871 turbo, so I'm far from pushing it's capabilities at that pressure). When I took it out last night, I hit 23psi w/ the same setting I had before.... so things are going screwy here!
I'm heading down to Dominion Raceway to run with the Audi club this weekend, so hoping to potentially tinker with some of this while I'm there and get it running a little better... if the radiator holds up. My swanky custom AL radiator has started to leak. Apparently it wore out from sitting, as I'm lucky if I've put 5k miles on it since installing it....
- Attachments
-
- Trial Runs Round 2.xls
- (63.5 KiB) Downloaded 1688 times
-
- Trial Runs Round 1.xls
- (151.5 KiB) Downloaded 1626 times
Re: Justin's '85 UrQ'd 4000 20vt Project - Tuning Help?
I checked out the logs. A couple thoughts--
1) You're running a Zeitronix display, and it is not connected up to the ECU in a regular capacity, correct? The A/F readings in this are gibberish so I'm just making sure--it is saying it goes lean under WOT.
2) At the ECU map sensor, it's running 205-220kpa, which is what you were looking for. Boost gauges suck.
3) I am far from a 20vt expert tuner, but 20deg at 1-1.1bar of boost on a 'stock frame' turbo/stock exhaust manifold seems like a lot. It is also a very flat curve to redline; I bet there is a lot of power on the table either way. Compare to this map from a stock MC1, and extrapolate from there: http://www.not2fast.com/audi/info/audiMCign16.jpg
I don't see any evidence of the accel enrichment spree I was thinking about. If it's puking under WOT I would gess it is ignition related. Maybe check the condition of your cap and rotor?
Sam
Sam Stone
-
audifreakjim
- Posts: 2145
- Joined: Sun Mar 03, 2013 3:00 pm
Re: Justin's '85 UrQ'd 4000 20vt Project - Tuning Help?
There can be a situation where you have too much advance or retard than the rotor and cap can tolerate. Too much or little and you are jumping spark. Back down the boost and find the point where it's stable. Then you can play with rotating the distributor to get you a Little more range for ign retard. If this is even the problem
Re: Justin's '85 UrQ'd 4000 20vt Project - Tuning Help?
Sam - I can almost PROMISE that there is power left on the table. This tune is far from optimized on this car. This is a tune I got from someone w/ a similar setup and a Ic ECU - so other than tweaking the fuel tables some, that's about the extent of what I've done.
Jim - I remember this being an issue when I had it on the Ib ECU, and we actually slightly clocked/adjusted the rotor to fix this.
A couple observations from taking it out on Saturday:
1) Backing down the accel enrichment settings some made it do a LOT less bucking at part throttle. So I think this had something to do with one of my issues.
2) Whether under load or free revving, if I gradually increased the throttle - I wouldn't get any breakup. If I mash the gas (WOT), in the 2800-3200 RPM arena I'm getting serious hesitation that sounds like I have some type of launch control going on. Will also backfire a fair amount. When this happens, nothing on the logs show anything being askew. This is leading me to think that I need to give the car a tune-up w/ new plugs, rotor and cap. They're not very old at all, but other than replacing the wires (magnecore), that's the last thing I can think of. I had this issue years ago after a track event, and replacing the plugs fixed the issue.
3) When the car would do the hiccupping/stumbling/backfiring, I apparently put off quite the fire show out the tail pipe! Had a few buddies behind me that would tell me they'd see the black puffs of smoke followed by a flame from time to time. Hopefully one of them caught it on video (more so I can see what it looks like than anything else!)
4) At not-WOT (50-75% throttle), but trying to accel (think going through esses but not having the balls to go WOT), the turbo is surging - going from 17psi to 22psi. If I'd pin the throttle, it will go to a constant 17-18psi. If I shift to 5th to lower the RPMs down a straight, it will start pulsing again. I know my BOV is open when idling (not sure if it's supposed to be) - could a leaking BOV cause this type of behavior? Never had it do this before!
5) Car is running hot... too hot. With a shrouded 3" thick AL radiator, I'm still seeing temps pushing past 230*. I'm not making it through a 30 min session without slowing down for 2-3 laps or pitting in for 5 min. As soon as I stop pushing the car, the temps come back into control reasonably quickly. Oil temps are way high too, but not sure I trust my gauge in truth. I have a good sized cooler, but it's not well shrouded. Will probably end up getting some type of pull fan to put on the back of it I think.
So that's my book report! I have some video I'll upload. Dominion Raceway was a fun track to play on. It still needs a LOT of work until it's 100% ready, but it was close to home and gave me a day to tinker with the car some more!
Thanks for the input fellas! Really appreciate it.
-
audifreakjim
- Posts: 2145
- Joined: Sun Mar 03, 2013 3:00 pm
Re: Justin's '85 UrQ'd 4000 20vt Project - Tuning Help?
It sounds like it's dumping fuel for accell enrichment. Try disabling it, or just unplugging your TPS. Drivability will suffer, but if it clears up the stumbling at WOTyou know where to start.
Yeah, always start with new plugs, they don't last long on these higher boost motors.
The BOV should not cause boost spikes, if you are not using an N75 type valve and boost is surging, check your diaphragm on the WG. It might be torn.
Yeah, always start with new plugs, they don't last long on these higher boost motors.
The BOV should not cause boost spikes, if you are not using an N75 type valve and boost is surging, check your diaphragm on the WG. It might be torn.
Re: Justin's '85 UrQ'd 4000 20vt Project - Tuning Help?
If I unplug the TPS, that means (assuming car is at idle and I'm just free revving the motor) if I floor it and go WOT in neutral, if it doesn't do the stuttering that I was seeing, then it's more than likely the fuel enrichment?audifreakjim wrote:It sounds like it's dumping fuel for accell enrichment. Try disabling it, or just unplugging your TPS. Drivability will suffer, but if it clears up the stumbling at WOTyou know where to start.
Yeah, always start with new plugs, they don't last long on these higher boost motors.
The BOV should not cause boost spikes, if you are not using an N75 type valve and boost is surging, check your diaphragm on the WG. It might be torn.
I just had the WG off (studs kept backing out of the manifold making a leak), but didn't check for leaks. It started doing it half way through Watkins Glen a month back, otherwise it used to be solid at 18psi. Would a torn boot still give me steady boost though at times? It's sporadic enough, I'm just not sure. Can pop the cap off and inspect it though - not a big deal.
New plugs, cap and rotor will be sourced and continue to tinker. Hopefully I'll be able to do this relatively soon, but wife is about to pop with #2... It's always something!
Re: Justin's '85 UrQ'd 4000 20vt Project - Tuning Help?
Also - Sam, in response to Zetronix unit - correct.
I have it hooked up to the ECU via resistors (based on recommendations from "The Architect" a few years ago), but never got it to read correctly w/ the ECU. So those numbers in the log in regards to A/F are gibberish. That's another thing that I need to address eventually!
I have it hooked up to the ECU via resistors (based on recommendations from "The Architect" a few years ago), but never got it to read correctly w/ the ECU. So those numbers in the log in regards to A/F are gibberish. That's another thing that I need to address eventually!
-
audifreakjim
- Posts: 2145
- Joined: Sun Mar 03, 2013 3:00 pm
Re: Justin's '85 UrQ'd 4000 20vt Project - Tuning Help?
Congrats on #2
If I unplug the TPS, that means (assuming car is at idle and I'm just free revving the motor) if I floor it and go WOT in neutral, if it doesn't do the stuttering that I was seeing, then it's more than likely the fuel enrichment? -- Correct, although it may stumble a little due to lack of fuel when you punch the gas but it will be very brief.
I just had the WG off (studs kept backing out of the manifold making a leak), but didn't check for leaks. -- This could have been your problem, although it would have probably caused a lack of boost
It started doing it half way through Watkins Glen a month back, otherwise it used to be solid at 18psi. Would a torn boot still give me steady boost though at times? -- It could at times as the pressure stabilizes inside the WG, also it may seal itself up depending on where the tear is. I'd apply some pressure to the upper chamber and see if it holds. This would show a tear. the bottom chamber will leak down due to the piston, but the lower chamber hose should be checked as well.
Re: Justin's '85 UrQ'd 4000 20vt Project - Tuning Help?
Thanks! Baby girl this time around... should make life more interesting than w/ just the little dude!audifreakjim wrote:Congrats on #2
Sounds good - will give this a try and see. Gets worse as the car warms up (for what that's worth), but def worth a shot!audifreakjim wrote:If I unplug the TPS, that means (assuming car is at idle and I'm just free revving the motor) if I floor it and go WOT in neutral, if it doesn't do the stuttering that I was seeing, then it's more than likely the fuel enrichment? -- Correct, although it may stumble a little due to lack of fuel when you punch the gas but it will be very brief.
It was just a slight putter - but 3 out of the 4 studs were loose, so lord knows! I got it GOOD 'n tight now (welded up my own tool so I could actually get some torque on it, AND used some Stage 8 nuts w/ locking fingers as well). I was always able to hit boost - turbo probably just had to work a little harder.audifreakjim wrote:I just had the WG off (studs kept backing out of the manifold making a leak), but didn't check for leaks. -- This could have been your problem, although it would have probably caused a lack of boost
Perfect... I should be able to do that really easily. Will rig something up and pump some air into it! I'm curious if I ripped something when I had it off - or if it just got tired and gave up! It's easily pushing 25 yrs old at this point I have to imagine.audifreakjim wrote:It started doing it half way through Watkins Glen a month back, otherwise it used to be solid at 18psi. Would a torn boot still give me steady boost though at times? -- It could at times as the pressure stabilizes inside the WG, also it may seal itself up depending on where the tear is. I'd apply some pressure to the upper chamber and see if it holds. This would show a tear. the bottom chamber will leak down due to the piston, but the lower chamber hose should be checked as well.
Thanks, Jim! Appreciate the insight.
Re: Justin's '85 UrQ'd 4000 20vt Project - Tuning Help?
Getting fuel and ignition dialled in will help a lot with temps. I was having cooling problems at cruise until I got my timing and partial throttle fueling figured out, now it runs like stock (or did until I melted it down).
Sam
Sam
Sam Stone