
I can't wait to see this done!!!
Justin's '85 UrQ'd 4000 20vt Project - Tuning Help?
Re: Justin's '85 4000 20vt Project: Got sex'd by an UrQ?
I can't wait to see this done!!!
-Ben-

-1985 Audi 4kq: Xona 7164 AAN 488whp- -2009 Audi A4 -
-1985 Audi 4kq: Xona 7164 AAN 488whp- -2009 Audi A4 -
Re: Justin's '85 4000 20vt Project: Got sex'd by an UrQ?
Looks awesome! Wow.
How come the rear quarter is masked off?
How come the rear quarter is masked off?
Re: Justin's '85 4000 20vt Project: Got sex'd by an UrQ?
rear quarters are masked off so when they reinstall the doors, they spray it all at the same time and make sure it all looks the same. W/ the metallic/pearl effect paint, if they painted them at separate times there's a risk of having them come out different colors depending on how the paint is laid down.
At least, that's how it was explained to me
At least, that's how it was explained to me
Re: Justin's '85 4000 20vt Project: Got sex'd by an UrQ?
Makes sense. Nice work

Re: Justin's '85 4000 20vt Project: Got sex'd by an UrQ?
Looks awesome already!
Casey O
Current Attire:
- 2007 Audi A3 3.2 quattro
Past Projects:
- 07 Cooper S - 91 200 20vt - 91 90 20v - 85 4000CS - 96 Audi Cabriolet 5 Spd - 02 A4 1.8T - 91 V8 5 Spd - 01 A6 2.7T 6 Spd Sport - 86 5000CS - 91 100
Current Attire:
- 2007 Audi A3 3.2 quattro
Past Projects:
- 07 Cooper S - 91 200 20vt - 91 90 20v - 85 4000CS - 96 Audi Cabriolet 5 Spd - 02 A4 1.8T - 91 V8 5 Spd - 01 A6 2.7T 6 Spd Sport - 86 5000CS - 91 100

Re: Justin's '85 4000 20vt Project: Got sex'd by an UrQ?
Awesome colour. looks very close to what I was planning (in the distant future). The Ferrari f1 red from a few years ago really caught my eye, kind of like a metallic raspberry but not so pink. Bring it to Carlisle?
Matt
18 Silverado 1500 work pig, roof rack and tonneau cover
11 Jetta sedan TDI DSG, rear muffler delete
GONE :( 87 4ktq - 4 FOX SNAKES

18 Silverado 1500 work pig, roof rack and tonneau cover
11 Jetta sedan TDI DSG, rear muffler delete
GONE :( 87 4ktq - 4 FOX SNAKES
Re: Justin's '85 4000 20vt Project: Got sex'd by an UrQ?
HOping to get it assembled and at least idling/driveable so I can bring it up for Marc to tune at Carlisle... so yeah, that's the plan!
Re: Justin's '85 4000 20vt Project: Got sex'd by an UrQ?
Yeehaw! And if Marc is too busy, which can *sometimes* happen (lol) I'm sure many others could help you tune as well.
Matt
18 Silverado 1500 work pig, roof rack and tonneau cover
11 Jetta sedan TDI DSG, rear muffler delete
GONE :( 87 4ktq - 4 FOX SNAKES
18 Silverado 1500 work pig, roof rack and tonneau cover
11 Jetta sedan TDI DSG, rear muffler delete
GONE :( 87 4ktq - 4 FOX SNAKES
Re: Justin's '85 4000 20vt Project: Got sex'd by an UrQ?
Getting closer!
Car has all its panels reinstalled, and as of yesterday they were starting to tape it off in prep for full body color. One more week to go!


Hopefully VIR will distract me enough next week that I won't be too worried about the car getting done, etc. I have weak hopes of picking it up next Thursday, but I'm am NOT holding my breath one bit. We shall see how it goes, though.
Car has all its panels reinstalled, and as of yesterday they were starting to tape it off in prep for full body color. One more week to go!
Hopefully VIR will distract me enough next week that I won't be too worried about the car getting done, etc. I have weak hopes of picking it up next Thursday, but I'm am NOT holding my breath one bit. We shall see how it goes, though.
Re: Justin's '85 4000 20vt Project: Got sex'd by an UrQ?
oh snap! looks great
Re: Justin's '85 4000 20vt Project: Got sex'd by an UrQ?
That looks amazing, Justin...I can't wait to see it once they color the rest!
90 Coupe Quattro - 3b + 01e
87 4000 - future trail rig
00 a6 2.7t 6speed - winter beater
87 4000 - future trail rig
00 a6 2.7t 6speed - winter beater
Re: Justin's '85 4000 20vt Project: Got sex'd by an UrQ?
That looks crazy good already....
Casey O
Current Attire:
- 2007 Audi A3 3.2 quattro
Past Projects:
- 07 Cooper S - 91 200 20vt - 91 90 20v - 85 4000CS - 96 Audi Cabriolet 5 Spd - 02 A4 1.8T - 91 V8 5 Spd - 01 A6 2.7T 6 Spd Sport - 86 5000CS - 91 100
Current Attire:
- 2007 Audi A3 3.2 quattro
Past Projects:
- 07 Cooper S - 91 200 20vt - 91 90 20v - 85 4000CS - 96 Audi Cabriolet 5 Spd - 02 A4 1.8T - 91 V8 5 Spd - 01 A6 2.7T 6 Spd Sport - 86 5000CS - 91 100
Re: Justin's '85 4000 20vt Project: Got sex'd by an UrQ?
Yeah, super jealous.
Matt
18 Silverado 1500 work pig, roof rack and tonneau cover
11 Jetta sedan TDI DSG, rear muffler delete
GONE :( 87 4ktq - 4 FOX SNAKES
18 Silverado 1500 work pig, roof rack and tonneau cover
11 Jetta sedan TDI DSG, rear muffler delete
GONE :( 87 4ktq - 4 FOX SNAKES
Re: Justin's '85 4000 20vt Project: Got sex'd by an UrQ?
Looks great, i like the colour!
Cheers, Mike
Cheers, Mike
Re: Justin's '85 4000 20vt Project: Got sex'd by an UrQ?
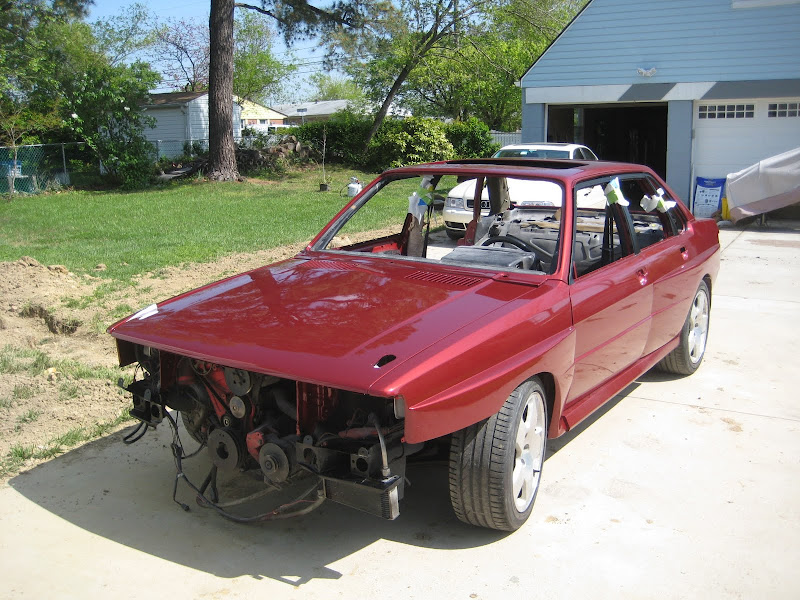
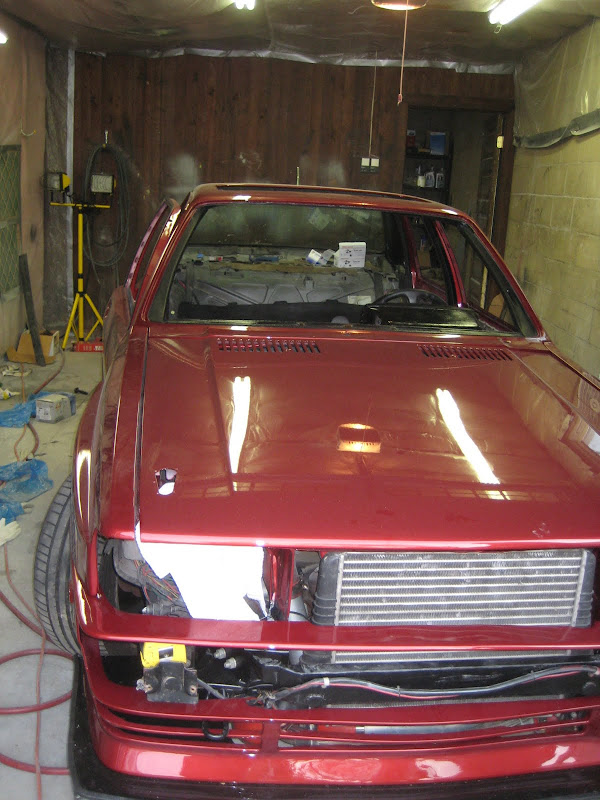
After about a 7 week wait, I finally have about 85% of the car back in my posession
Late last week, the pictures started flowing in of the 'ol bird in the paint booth :


Needless to say, my wife practically had to scrape me off the ceiling after my explosion of excitement. To make things better, the car was ready to pick up earlier this week (yeah, I've been holding out on you all a little, sorry :-P).
So I made the trek out w/ the trailer to finally see my car in person, totally painted for the first time in about 2 years. When we pushed the car out into the sun, I can tell you that it was a very strange feeling. One of those, "you've been working so long/hard that you never thought you'd see the day w/ it being done" kind of feelings. I won't go as far as saying it was a religious experience... but yeah. I circled the car for a good 15 minutes in the parking lot just looking at it. I couldn't believe my eyes that this was my car!
After gazing at it long enough though, onto the trailer she went!

and the slow and careful drive home began. I can almost say I was looking in the rear view mirror more than I was ahead of me. Not necessarily a good thing, but I couldn't keep my eyes off the car!


The finish is absolutely beautiful. They did a spectacular job painting the car, but told me that the bodywork prep that I had done beforehand was really top notch, and that I should be very proud of myself. Shop manager even joked if I was going to be putting in a resume... haha. That meant a lot to me, and made me really happy.
To add a cherry to the top of the cake, the car runs again too (though unhappily)! Thanks to a fellow 4000 owner for sending me his tune, I was able to get the car idling again and reving. I have some tuning to do to make the car driveable again, but as of right now, it was a step in the right direction!!!
I don't have EVERYTHING back, unfortunately. The shop still needs to finish the bumpers, sunroof, clear the CF hood and fix the pass rear door (there were blemishes in the paint that I couldn't live with and asked them to fix it). So hopefully in the next couple weeks I'll be able to head out and grab those parts, but until then... I have my work cut out ahead of me to start reassembling everything and get it running properly again. Very excited! But I have a LOT of work to do in the next couple weeks to get this thing assembled and driveable.
So now begins the fun... getting the car back together! Hoping to get it good enough to head to Carilsle in a couple of weeks, but we'll see how progress goes. Need to find a cheap 3" muffler too, as I won't have time to really redo the exhaust like I want, and I've put myself on a spending freeze as I've already blown too much on this car already... haha.
Late last week, the pictures started flowing in of the 'ol bird in the paint booth :
Needless to say, my wife practically had to scrape me off the ceiling after my explosion of excitement. To make things better, the car was ready to pick up earlier this week (yeah, I've been holding out on you all a little, sorry :-P).
So I made the trek out w/ the trailer to finally see my car in person, totally painted for the first time in about 2 years. When we pushed the car out into the sun, I can tell you that it was a very strange feeling. One of those, "you've been working so long/hard that you never thought you'd see the day w/ it being done" kind of feelings. I won't go as far as saying it was a religious experience... but yeah. I circled the car for a good 15 minutes in the parking lot just looking at it. I couldn't believe my eyes that this was my car!
After gazing at it long enough though, onto the trailer she went!
and the slow and careful drive home began. I can almost say I was looking in the rear view mirror more than I was ahead of me. Not necessarily a good thing, but I couldn't keep my eyes off the car!
The finish is absolutely beautiful. They did a spectacular job painting the car, but told me that the bodywork prep that I had done beforehand was really top notch, and that I should be very proud of myself. Shop manager even joked if I was going to be putting in a resume... haha. That meant a lot to me, and made me really happy.
To add a cherry to the top of the cake, the car runs again too (though unhappily)! Thanks to a fellow 4000 owner for sending me his tune, I was able to get the car idling again and reving. I have some tuning to do to make the car driveable again, but as of right now, it was a step in the right direction!!!
I don't have EVERYTHING back, unfortunately. The shop still needs to finish the bumpers, sunroof, clear the CF hood and fix the pass rear door (there were blemishes in the paint that I couldn't live with and asked them to fix it). So hopefully in the next couple weeks I'll be able to head out and grab those parts, but until then... I have my work cut out ahead of me to start reassembling everything and get it running properly again. Very excited! But I have a LOT of work to do in the next couple weeks to get this thing assembled and driveable.
So now begins the fun... getting the car back together! Hoping to get it good enough to head to Carilsle in a couple of weeks, but we'll see how progress goes. Need to find a cheap 3" muffler too, as I won't have time to really redo the exhaust like I want, and I've put myself on a spending freeze as I've already blown too much on this car already... haha.
-
crimson ghost
- Posts: 33
- Joined: Thu Mar 07, 2013 5:17 pm
Re: Justin's '85 4000 20vt Project: Got sex'd by an UrQ?
Looks great !

Re: Justin's '85 4000 20vt Project: Got sex'd by an UrQ?
-Shawn C.
2001 S4 6spd Avant blk/blk - stock daily
2002 01E B6 A4 Built FYF, Built 1.8T, HX35 ~330whp
1989 MC-1 200 Avant- MS1 -Gone but will never forget her lessons
1987 5ktq Sedan - Best $500 beater ever
2001 S4 6spd Avant blk/blk - stock daily
2002 01E B6 A4 Built FYF, Built 1.8T, HX35 ~330whp
1989 MC-1 200 Avant- MS1 -Gone but will never forget her lessons
1987 5ktq Sedan - Best $500 beater ever
Re: Justin's '85 4000 20vt Project: Got sex'd by an UrQ?
That is the straw that broke my factory flare's back. It looks amazing.
Re: Justin's '85 4000 20vt Project: Got sex'd by an UrQ?
Amazing stuff Justin, car looks so dang good. Can't wait to see it at Carlisle!
Matt
18 Silverado 1500 work pig, roof rack and tonneau cover
11 Jetta sedan TDI DSG, rear muffler delete
GONE :( 87 4ktq - 4 FOX SNAKES
18 Silverado 1500 work pig, roof rack and tonneau cover
11 Jetta sedan TDI DSG, rear muffler delete
GONE :( 87 4ktq - 4 FOX SNAKES
Re: Justin's '85 4000 20vt Project: Got sex'd by an UrQ?
Thanks for the kind words, all! Hopeful for Carlisle, but car is back to fighting me to get it running. Cyl #5 is flooding w/ fuel (i.e. piston cup was full of gas) and it's not firing on all cylinders. Ran a bunch of logs and need to pull them off the computer and see what I can figure out.
Frustrating for sure, but not much I can do. Will keep plugging at it and see what I can figure out.
Frustrating for sure, but not much I can do. Will keep plugging at it and see what I can figure out.
Re: Justin's '85 4000 20vt Project: Got sex'd by an UrQ?
Good gosh.... 
-Ben-
-1985 Audi 4kq: Xona 7164 AAN 488whp- -2009 Audi A4 -
-1985 Audi 4kq: Xona 7164 AAN 488whp- -2009 Audi A4 -
Re: Justin's '85 4000 20vt Project: Got sex'd by an UrQ?
Been watching this car for awhile now and it looks like it was worth the wait. The car looks great. One of the things that I have always liked about the Urqs is that you don't see one on every corner or hardly at all for that matter. It looks like you are in a class of your own. Nice!!!
-
HT Motorsport
- Posts: 350
- Joined: Wed Feb 27, 2013 11:56 am
Re: Justin's '85 4000 20vt Project: Got sex'd by an UrQ?
Looks amazing!!! Bravo for sticking with it, learning a lot and doing it right! CU at Carlisle with any luck.
Re: Justin's '85 4000 20vt Project: Got sex'd by an UrQ?
Thanks John and Hadyn! Much appreciated. I'm thinking, worst case, I might tow the damn thing to Carlisle if I can't get it running right so I can get some knowledgeble people helping me get it right. Will see. I have access to everything, just not sure where I could park the tow vehicle/trailer once the car is unloaded.
Re: Justin's '85 4000 20vt Project: Got sex'd by an UrQ?
After giving myself a little break from the car, I figured I’d give a little picture show of what went into the car the two weeks before Carlisle. I was in the garage for at least an hour or two a day in an attempt to make sure the car was as assembled as I possibly could make it.
Once I got the ‘ol girl back from the body shop, the first thing that needed to go in before I could start putting the glass, etc in was the headliner. When I had pulled the old one, it was blatantly obvious that it wasn’t going to be going back in the car. There were tears on the C-pillar, and it tore a few times when I was peeling it off. I wasn’t overly heart broken by this as I was planning on getting a black headliner custom made by an upholstery shop I knew back where I grew up.
First thing I will say is, these things are an absolute, miserable, royal pain in the a$$ to install. I can’t even describe to you the frustrations that are involved with installing these headliners. I knew it wasn’t going to be easy, but man oh man, I didn’t know what I had gotten myself into!
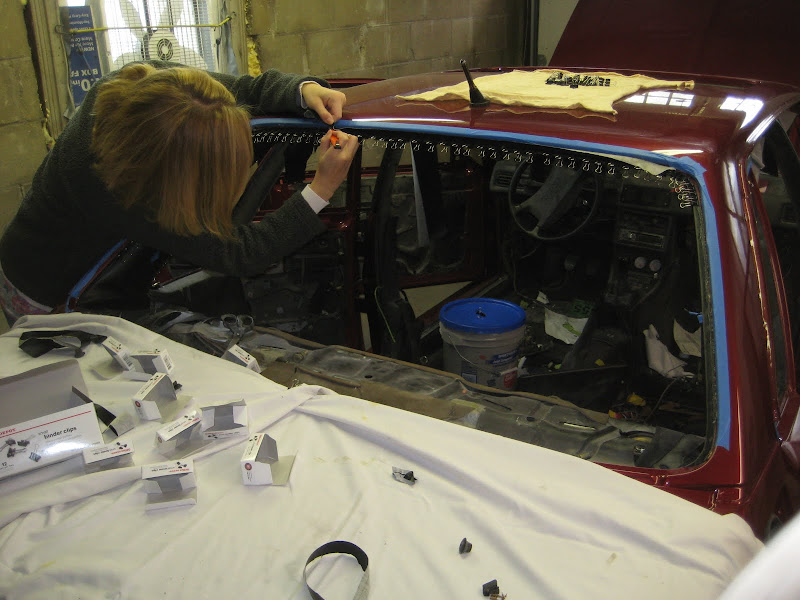
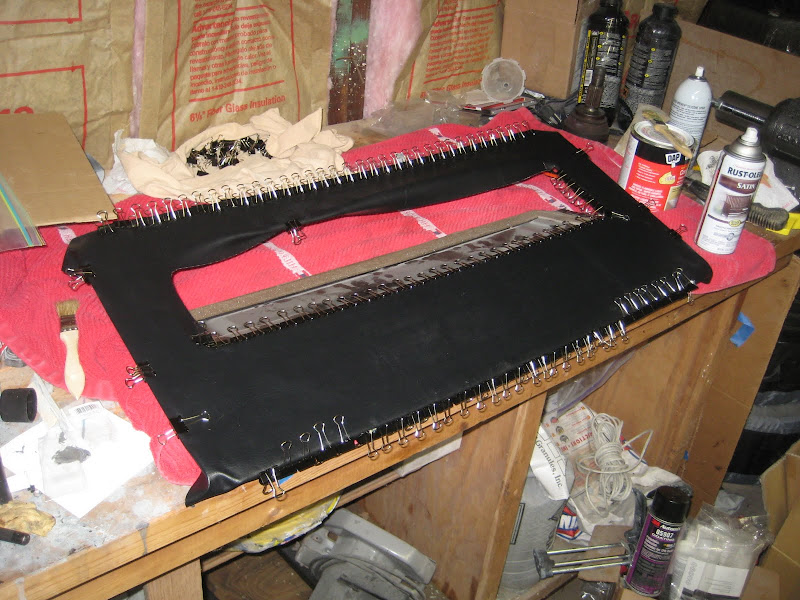
I started off with the easy part… install the backing bars and loosely clip it into place:


Then came the real fun… gluing the headliner to the pinch welds around the rear window and quarter window… without excessive wrinkles!


The last picture shows what 140ish binder clips look like on the back of the car! That was also the entire stash of clips that I had, so it forced me to do the install in phases. In reality, this (at least for me) is the right way to do it as you have to pull decently hard in spots to get things to stretch the way you want them. By doing so, it puts strain on areas that you already glued. This isn’t as big of a deal on areas around the rear window where there’s a large glue area, but for smaller areas such as the sunroof, you didn’t have as much working for you.
Once I gave it a day or so, the mrs and I went back to the garage and started to trim and work on the next area… the sunroof:


And the sunroof:


Once the sunroof was done, it was onto waiting another day or so to make sure the glue cured and then started in on the front windshield area:

Then wait again and start on the driver’s side:

And the passenger’s side (phase 4?):

Finishing up the C-pillar:

Not looking too bad:

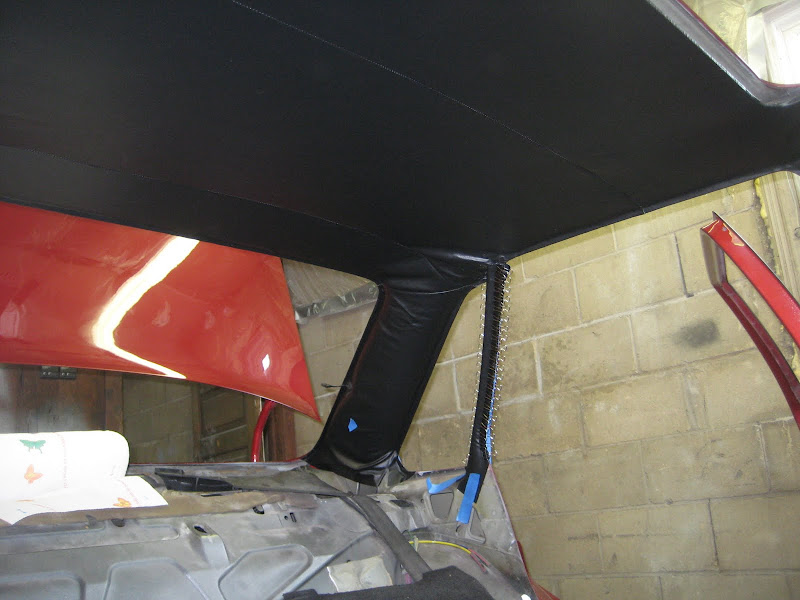
There are a few wrinkles in spots around the D-pillar around the rear window, but I was able to get the majority of them out. The pictures tend to make them look worse than they really are, but in reality they’re still not as smooth as factory. I attribute that to me asking the upholstery shop to sew the pillar pieces onto the main piece, where the factory used to glue it. This created a “stiff” area that made it really difficult to get it to form the way I wanted it to. Overall though, it turned out pretty well. Each phase (Rear window/quarters, sunroof, front windshield, driver’s side openings, pass side openings, c-pillar pieces) took easily 2-3 hrs a piece, and I left a day in between each to let the glue dry/cure. So the headliner alone took me about a week to install. Royal, unbelievable, miserable pain in the a$$ indeed!
Once I got the headliner in, I then finished the last piece w/ some scraps I had left – the sunroof panel:
Once all the headliner work was done, I started in on the rubber gaskets. Since everything had been sitting in the garage collecting dust for the past 2+ years, I took everything out and gave it a good scrubbing. Additionally, I also reconditioned the rubber to breathe a little life back into it.

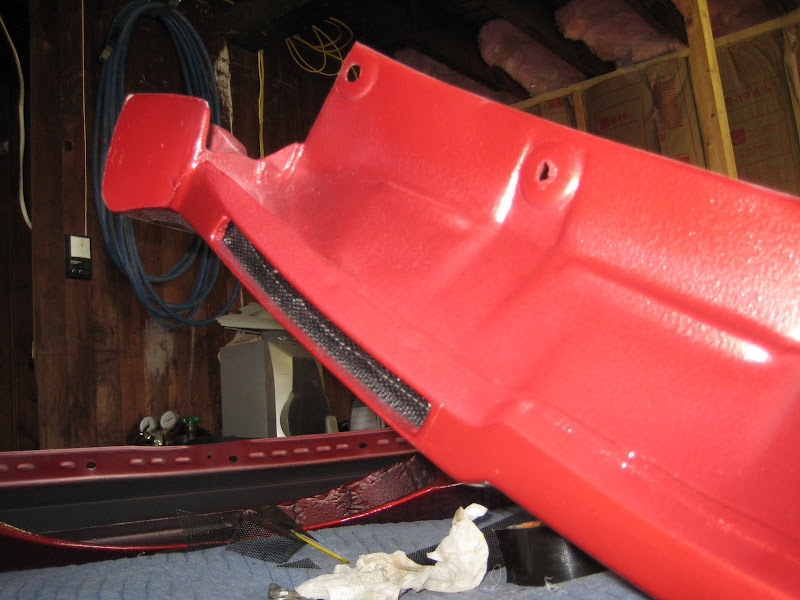
While the seals dried, I then got to bending up some mesh for the vents on the front fenders. I picked up a small opening 1’ x 1’ square of AL expanded metal from McMaster and painted it satin black. From there, I went to bending/forming/fitting and gluing:


Then the next fun… grabbed the wife and drug her outside with me to help install the front and rear glass. To my surprise, this went relatively painlessly. I made sure to REALLY soap up the rope (1/8” nylon for those curious) and the seal itself w/ a high concentrate dish soap to water “solution.”
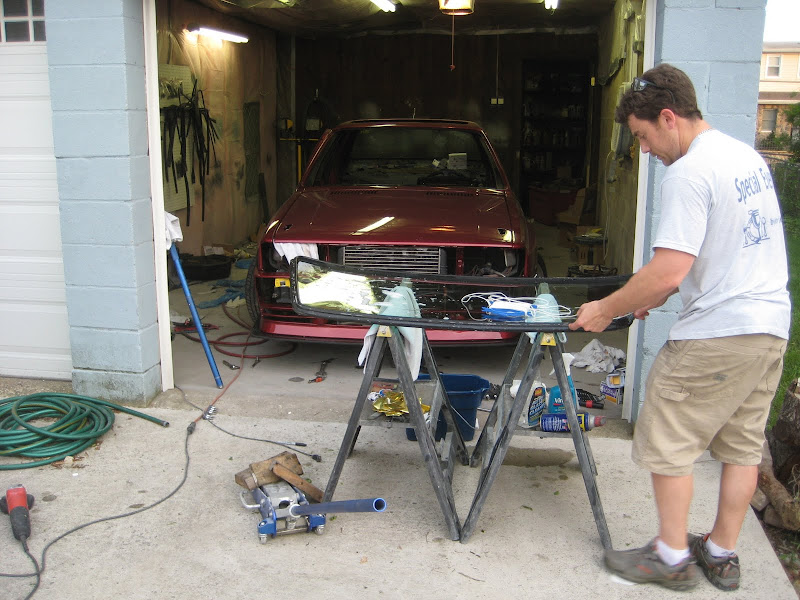

The patient awaiting her goods:
And after a half hour… we have glass!

Once the glass was in, next up was the sunroof.

Yes, that’s a brand spanking new seal
At the moment, after installing my brand spanking new seal that I picked up a few years ago for cheap off ebay, I just sort of bolted and positioned it in place. I haven’t messed with getting it operational…
Why you ask? Well… I have spare parts and for the life of me can’t figure out where they go (and can’t find them in the manual):

Anyone care to help me figure out where these parts snap to???? I would REALLY appreciate it!
And yeah… bloody finger = another reason I hate the sunroof… lol. Took a bit for that to stop bleeding.
The Friday before Carlisle I ended up working until about 1am trying to get the car all buttoned up. Wiley pulled through in a big way and snagged a trailer for me from a friend and brought it over. He stuck with me helping assemble things on the car til about 1245 and headed home. At 615 I was up again and by 630 Wiley was back again helping me hook up the trailer and get the car buttoned up. We put the roll bar in at 720 and got the car up onto the trailer and hit the road.
Wiley rinsed off the dirty beast from the dust in my garage from working in/around it for 2 weeks


Giving the starter motor a break halfway up the trailer:

And a pit stop along the George Washington parkway to make sure all the straps were tight:

And a shot of Wiley’s car and mine side by side…

Wiley’s car provided a LOT of life support to my old bird. We spent 2ish hours on Saturday w/ Hank Iroz and Marc Swanson trying to get the beater up and running again, which ended up killing my battery in the car as well as my laptop. Thankfully Wiley had the car stocked w/ jumpers and a converter, so we were able to keep everything powered while we were zeroing in timing, making sure the fuel tables looked OK, making sure the timing tables looked OK, etc. Unfortunately, no matter what we were tossing at it, we just couldn’t get the car to fire.
It wasn’t until Hank started to flex his forearm a little bit working the throttle body while Marc worked the fuel trim on the ECU did we get it breathing a little life… albeit not happily.

To keep things innocent, I refrained from videotaping Hank’s… ummm… actions and facial expressions. I think the two kids prove that he’s not used to doing that type of thing anymore
Main consensus was that the injectors were gummed up. While the motor was getting fuel, it wasn’t getting enough of it. So it would end up fouling the plugs before it would get the motor running, and the only way we had it running was when Hank and Marc were working their magic by spastically revving the motor via the throttle body and increasing the fuel into the motor to the point it should have been blowing gas out the tail pipe!
To confirm the injectors were indeed the culprit, we decided to get it idling on some starting fluid. Hank was under the hood spraying into the intake while I was working the ignition/throttle. To my glee, we did get the car idling and revving… but that was slightly short lived.
Starting fluid is very explosive… and unfortunately, the ‘ol bird backfired into the intake a little bit, which ignited the spray that was in the intake. This in turn blew the driver’s side of the intercooler!
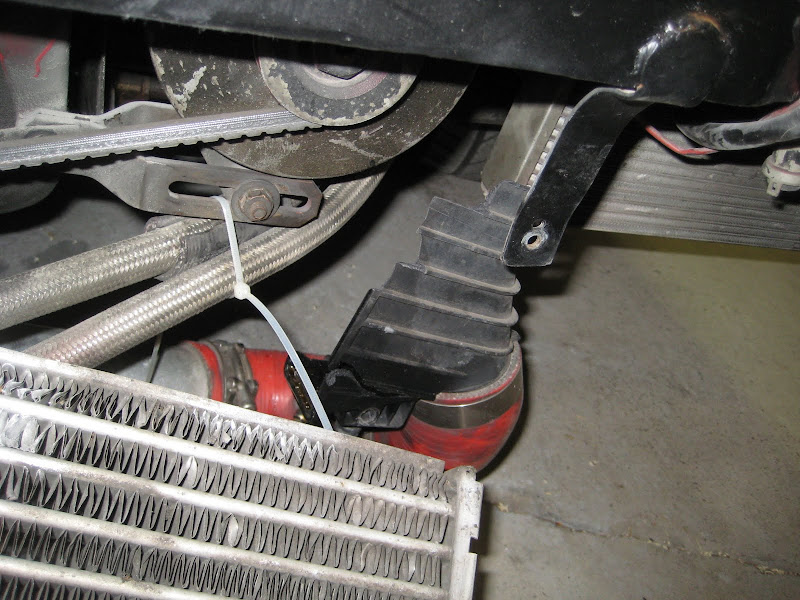


And subsequently took out my driver’s side Cibie :(
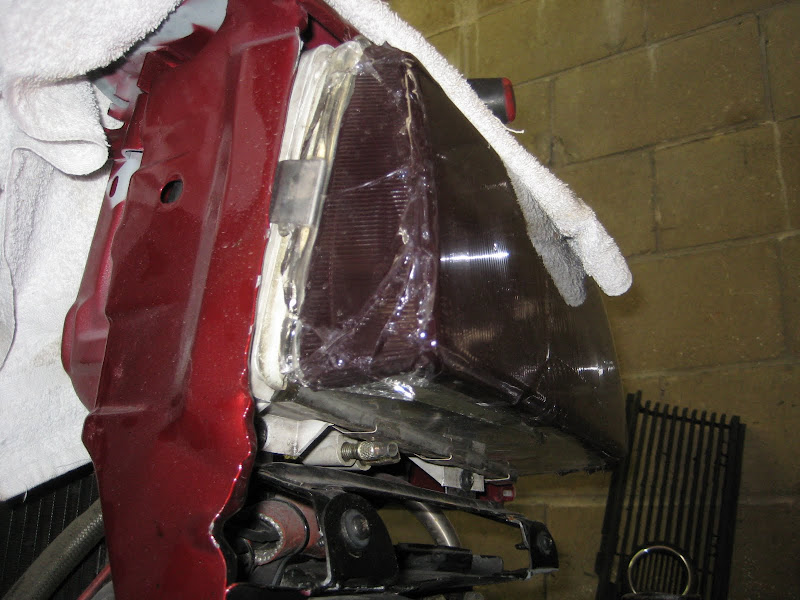
But thankfully, 1) no one was hurt - which was damn impressive considering the amount of bystanders watching the show at Carlisle and 2) no paint was damaged!!! So this is a bit of a setback, but where lemons are found… we make lemonade shortly after!
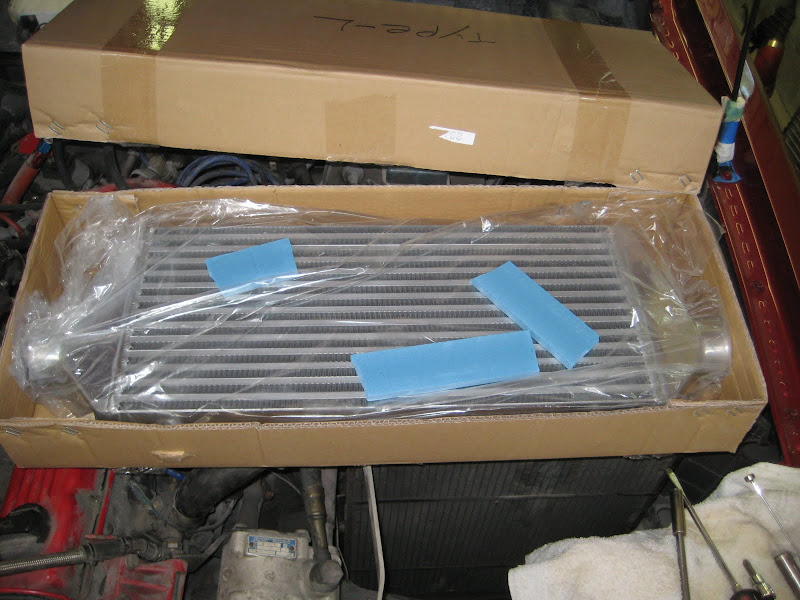
Given the goals for the new tune, I was of the realization that the old IC wasn’t really going to hold up to the pressure (maxing around 25-26psi). So while I really didn’t want to deal with this right now (it’s been 2.5 years… I really want to drive my car!!!), it was something I was going to have to deal with not too far down the road.
So at this point, I have my injectors sent out to be cleaned and flow matched, and am currently trying to shoehorn this IC into my car. Will take some time, but working on it as I find motivation. Hope to have it up/running in the next few weeks, but time will tell.
As a side note, I also want to add that Marc and Hank are awesome. They spent 2+ hours working with me trying to troubleshoot the car. I can't really express how thankful I am for their efforts and how willing/helpful they were to get this puppy roaring to life again. I know we were all a little let down by having to push the car back onto the trailer at the end of the day vs. it driving itself, but these guys gave it a HUGE effort, and I'm at a loss of words to express my thanks to you guys. You're both class acts w/o a single doubt!
Once I got the ‘ol girl back from the body shop, the first thing that needed to go in before I could start putting the glass, etc in was the headliner. When I had pulled the old one, it was blatantly obvious that it wasn’t going to be going back in the car. There were tears on the C-pillar, and it tore a few times when I was peeling it off. I wasn’t overly heart broken by this as I was planning on getting a black headliner custom made by an upholstery shop I knew back where I grew up.
First thing I will say is, these things are an absolute, miserable, royal pain in the a$$ to install. I can’t even describe to you the frustrations that are involved with installing these headliners. I knew it wasn’t going to be easy, but man oh man, I didn’t know what I had gotten myself into!
I started off with the easy part… install the backing bars and loosely clip it into place:
Then came the real fun… gluing the headliner to the pinch welds around the rear window and quarter window… without excessive wrinkles!
The last picture shows what 140ish binder clips look like on the back of the car! That was also the entire stash of clips that I had, so it forced me to do the install in phases. In reality, this (at least for me) is the right way to do it as you have to pull decently hard in spots to get things to stretch the way you want them. By doing so, it puts strain on areas that you already glued. This isn’t as big of a deal on areas around the rear window where there’s a large glue area, but for smaller areas such as the sunroof, you didn’t have as much working for you.
Once I gave it a day or so, the mrs and I went back to the garage and started to trim and work on the next area… the sunroof:
And the sunroof:
Once the sunroof was done, it was onto waiting another day or so to make sure the glue cured and then started in on the front windshield area:
Then wait again and start on the driver’s side:
And the passenger’s side (phase 4?):
Finishing up the C-pillar:
Not looking too bad:
There are a few wrinkles in spots around the D-pillar around the rear window, but I was able to get the majority of them out. The pictures tend to make them look worse than they really are, but in reality they’re still not as smooth as factory. I attribute that to me asking the upholstery shop to sew the pillar pieces onto the main piece, where the factory used to glue it. This created a “stiff” area that made it really difficult to get it to form the way I wanted it to. Overall though, it turned out pretty well. Each phase (Rear window/quarters, sunroof, front windshield, driver’s side openings, pass side openings, c-pillar pieces) took easily 2-3 hrs a piece, and I left a day in between each to let the glue dry/cure. So the headliner alone took me about a week to install. Royal, unbelievable, miserable pain in the a$$ indeed!
Once I got the headliner in, I then finished the last piece w/ some scraps I had left – the sunroof panel:
Once all the headliner work was done, I started in on the rubber gaskets. Since everything had been sitting in the garage collecting dust for the past 2+ years, I took everything out and gave it a good scrubbing. Additionally, I also reconditioned the rubber to breathe a little life back into it.
While the seals dried, I then got to bending up some mesh for the vents on the front fenders. I picked up a small opening 1’ x 1’ square of AL expanded metal from McMaster and painted it satin black. From there, I went to bending/forming/fitting and gluing:
Then the next fun… grabbed the wife and drug her outside with me to help install the front and rear glass. To my surprise, this went relatively painlessly. I made sure to REALLY soap up the rope (1/8” nylon for those curious) and the seal itself w/ a high concentrate dish soap to water “solution.”
The patient awaiting her goods:
And after a half hour… we have glass!
Once the glass was in, next up was the sunroof.
Yes, that’s a brand spanking new seal
At the moment, after installing my brand spanking new seal that I picked up a few years ago for cheap off ebay, I just sort of bolted and positioned it in place. I haven’t messed with getting it operational…
Why you ask? Well… I have spare parts and for the life of me can’t figure out where they go (and can’t find them in the manual):
Anyone care to help me figure out where these parts snap to???? I would REALLY appreciate it!
And yeah… bloody finger = another reason I hate the sunroof… lol. Took a bit for that to stop bleeding.
The Friday before Carlisle I ended up working until about 1am trying to get the car all buttoned up. Wiley pulled through in a big way and snagged a trailer for me from a friend and brought it over. He stuck with me helping assemble things on the car til about 1245 and headed home. At 615 I was up again and by 630 Wiley was back again helping me hook up the trailer and get the car buttoned up. We put the roll bar in at 720 and got the car up onto the trailer and hit the road.
Wiley rinsed off the dirty beast from the dust in my garage from working in/around it for 2 weeks
Giving the starter motor a break halfway up the trailer:
And a pit stop along the George Washington parkway to make sure all the straps were tight:
And a shot of Wiley’s car and mine side by side…
Wiley’s car provided a LOT of life support to my old bird. We spent 2ish hours on Saturday w/ Hank Iroz and Marc Swanson trying to get the beater up and running again, which ended up killing my battery in the car as well as my laptop. Thankfully Wiley had the car stocked w/ jumpers and a converter, so we were able to keep everything powered while we were zeroing in timing, making sure the fuel tables looked OK, making sure the timing tables looked OK, etc. Unfortunately, no matter what we were tossing at it, we just couldn’t get the car to fire.
It wasn’t until Hank started to flex his forearm a little bit working the throttle body while Marc worked the fuel trim on the ECU did we get it breathing a little life… albeit not happily.
To keep things innocent, I refrained from videotaping Hank’s… ummm… actions and facial expressions. I think the two kids prove that he’s not used to doing that type of thing anymore
Main consensus was that the injectors were gummed up. While the motor was getting fuel, it wasn’t getting enough of it. So it would end up fouling the plugs before it would get the motor running, and the only way we had it running was when Hank and Marc were working their magic by spastically revving the motor via the throttle body and increasing the fuel into the motor to the point it should have been blowing gas out the tail pipe!
To confirm the injectors were indeed the culprit, we decided to get it idling on some starting fluid. Hank was under the hood spraying into the intake while I was working the ignition/throttle. To my glee, we did get the car idling and revving… but that was slightly short lived.
Starting fluid is very explosive… and unfortunately, the ‘ol bird backfired into the intake a little bit, which ignited the spray that was in the intake. This in turn blew the driver’s side of the intercooler!
And subsequently took out my driver’s side Cibie :(
But thankfully, 1) no one was hurt - which was damn impressive considering the amount of bystanders watching the show at Carlisle and 2) no paint was damaged!!! So this is a bit of a setback, but where lemons are found… we make lemonade shortly after!
Given the goals for the new tune, I was of the realization that the old IC wasn’t really going to hold up to the pressure (maxing around 25-26psi). So while I really didn’t want to deal with this right now (it’s been 2.5 years… I really want to drive my car!!!), it was something I was going to have to deal with not too far down the road.
So at this point, I have my injectors sent out to be cleaned and flow matched, and am currently trying to shoehorn this IC into my car. Will take some time, but working on it as I find motivation. Hope to have it up/running in the next few weeks, but time will tell.
As a side note, I also want to add that Marc and Hank are awesome. They spent 2+ hours working with me trying to troubleshoot the car. I can't really express how thankful I am for their efforts and how willing/helpful they were to get this puppy roaring to life again. I know we were all a little let down by having to push the car back onto the trailer at the end of the day vs. it driving itself, but these guys gave it a HUGE effort, and I'm at a loss of words to express my thanks to you guys. You're both class acts w/o a single doubt!