I made the flares a bit wider than the UrQ flares... enough so I can squeeze 275s under there now
Justin's '85 UrQ'd 4000 20vt Project - Tuning Help?
Re: Justin's '85 4000 20vt Project: Got sex'd by an UrQ?
Yeah, by a tad bit  I def owe an update, but want to finish off all the sanding before doing so.
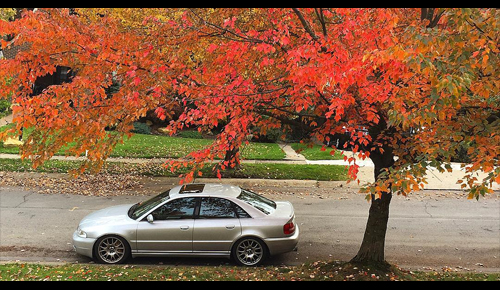
I made the flares a bit wider than the UrQ flares... enough so I can squeeze 275s under there now Fronts required some rework on the steering arm side of things, but nothing I'm tackling anytime soon.
I made the flares a bit wider than the UrQ flares... enough so I can squeeze 275s under there now
-
ralleyquattro

- Posts: 858
- Joined: Wed Feb 27, 2013 1:46 pm
Re: Justin's '85 4000 20vt Project: Got sex'd by an UrQ?
Looking good... did you see this yet??
http://www.classic-audi.co.uk/forum/sho ... hp?t=22591" onclick="window.open(this.href);return false; ... hp?t=22591" onclick="window.open(this.href);return false;
http://www.classic-audi.co.uk/forum/sho ... hp?t=22591" onclick="window.open(this.href);return false; ... hp?t=22591" onclick="window.open(this.href);return false;
Martin Pajak
http://www.quattro.ca
82 Audi Ur-q, SQ project
83 Audi 80 q, Euro 2-Door
85 Audi Ur-q, Euro mit 3B
91 Coupe Quattro
93 Audi 80 q Avant, 2.5 TDI with 6-speed
04 Audi A4 1.8Tq Avant USP 6-speed
04 Audi A4 3.0q Avant USP 6-speed
http://www.quattro.ca
82 Audi Ur-q, SQ project
83 Audi 80 q, Euro 2-Door
85 Audi Ur-q, Euro mit 3B
91 Coupe Quattro
93 Audi 80 q Avant, 2.5 TDI with 6-speed
04 Audi A4 1.8Tq Avant USP 6-speed
04 Audi A4 3.0q Avant USP 6-speed
Re: Justin's '85 4000 20vt Project: Got sex'd by an UrQ?
the "slant" grill looks funny with those lights.
-
nismo
Re: Justin's '85 4000 20vt Project: Got sex'd by an UrQ?
Stock fenders and Euros are a win, but I REALLY want to see a set of UrQ fenders on the back, custom UrQ fenders on the front (to match the following), and the SQ hood/grill/bumper. Custom built OEM HID projectors to finish it off FTW!
Eric
Eric

Re: Justin's '85 4000 20vt Project: Got sex'd by an UrQ?
HOLY CRAPJretal wrote:Yeah, by a tad bit
I made the flares a bit wider than the UrQ flares... enough so I can squeeze 275s under there now
-Ben-

-1985 Audi 4kq: Xona 7164 AAN 488whp- -2009 Audi A4 -
-1985 Audi 4kq: Xona 7164 AAN 488whp- -2009 Audi A4 -
-
nismo
Re: Justin's '85 4000 20vt Project: Got sex'd by an UrQ?
I wanna know why he's 5x120!
Eric
Eric
Re: Justin's '85 4000 20vt Project: Got sex'd by an UrQ?
Martin: I did on the QW forum... simply beautiful and a great motivator! Pushing my closer to wanting to do the rear tails just like that too, honestly. Was going to tint my entire rears, but I really like the looks of the Euro pieces like that. You don't have extras, do ya?
Eric: I'm 5x120 b/c I removed 4 out of 5 studs, and this was a replica wheel that had no hubcentric rim... so I was able to jimmy it onto the car to check clearances so I didn't have to go through the effort of mounting the 275s onto an 18" rim. Wheel was from my buddy's 335d that he used to track.
Nothing too fancy, just a short cut to save myself extra effort. Still looks awesome on the car though And makes me super happy considering I could BARELY fit the 235s under the ghetto "flared" fenders prior to this... and they still rubbed under hard corning. No longer going to be an issue for sure!
I had also toyed with building headlights w/ HID projectors in them, but have seen pix of them on an UrQ w/ euro lights, and I honestly don't quite care for the look. Crazy I know, but for some reason projector beams on these cars doesn't seem "right" to me.
Updates coming soon, though. Hopefully I have time to finish off the little bits I have left.
Eric: I'm 5x120 b/c I removed 4 out of 5 studs, and this was a replica wheel that had no hubcentric rim... so I was able to jimmy it onto the car to check clearances so I didn't have to go through the effort of mounting the 275s onto an 18" rim. Wheel was from my buddy's 335d that he used to track.
Nothing too fancy, just a short cut to save myself extra effort. Still looks awesome on the car though
I had also toyed with building headlights w/ HID projectors in them, but have seen pix of them on an UrQ w/ euro lights, and I honestly don't quite care for the look. Crazy I know, but for some reason projector beams on these cars doesn't seem "right" to me.
Updates coming soon, though. Hopefully I have time to finish off the little bits I have left.
-
30vQuattro
Re: Justin's '85 4000 20vt Project: Got sex'd by an UrQ?
Wow. Incredible build! Excited to see the finished product. Keep up the good work man!
-
ralleyquattro
- Posts: 858
- Joined: Wed Feb 27, 2013 1:46 pm
Re: Justin's '85 4000 20vt Project: Got sex'd by an UrQ?
Doh, I had the original Treser Hella with center section and sold them 6 months ago or so.. they were on Audifans.. maybe you snoozed.Jretal wrote:Martin: I did on the QW forum... simply beautiful and a great motivator! Pushing my closer to wanting to do the rear tails just like that too, honestly. Was going to tint my entire rears, but I really like the looks of the Euro pieces like that. You don't have extras, do ya?
Paul at CAC still has them aftermarket.
http://homepage.internet.lu/customautoc ... 0_4000.htm" onclick="window.open(this.href);return false; ... 0_4000.htm
Will we see you at Carlisle?
Cheers
Martin Pajak
http://www.quattro.ca
82 Audi Ur-q, SQ project
83 Audi 80 q, Euro 2-Door
85 Audi Ur-q, Euro mit 3B
91 Coupe Quattro
93 Audi 80 q Avant, 2.5 TDI with 6-speed
04 Audi A4 1.8Tq Avant USP 6-speed
04 Audi A4 3.0q Avant USP 6-speed
http://www.quattro.ca
82 Audi Ur-q, SQ project
83 Audi 80 q, Euro 2-Door
85 Audi Ur-q, Euro mit 3B
91 Coupe Quattro
93 Audi 80 q Avant, 2.5 TDI with 6-speed
04 Audi A4 1.8Tq Avant USP 6-speed
04 Audi A4 3.0q Avant USP 6-speed
Re: Justin's '85 4000 20vt Project: Got sex'd by an UrQ?
I will be there for a little bit at Carlisle. Picking up another "donor" Just staying for a few hours on Saturday.
Will try to seek you out this time, as I kept missing you 2 years ago. I'll be heading up w/ Wiley more than likely, so if you see his 4000 or S4... look for the shorter/smaller of the two people near it. That'll be me
Oh, and I more than likely snoozed, but if you see any in a reasonable price range, let me know. Otherwise I'll end up tinting mine, which is find too... but the real deal is always better.
Re: Justin's '85 4000 20vt Project: Got sex'd by an UrQ?
So, I think it's about time for an update. It's been a quite a bit since I've actually posted anything serious on the car for several months, though a few teaser shots were tossed up here and there from time to time. I was holding out until I could finally get it rolling again and outside to fully enjoy it in its fiberglass/non-painted glory! Well, the time has finally come! It's been a long road, but I'm really happy with the outcome.
When I finished off my last update, I had finally flattened the rear doors to the point I was content (they have a touch more work required, but they're 90% there) and was working on getting the gaps *right* where the back of the door met the quarter panel. After many hours sanding and tweaking, I got the gaps right where I wanted them... but forgot to take pictures of the "final" product, so you'll have to use your imagination
With the rear doors finished, I turned my attention to the front doors. At first glance, I didn't think the front doors were going to be that difficult of a project. A couple minor dimples and otherwise I had to clean up around the handles... or so I thought! They started out looking simple:
but ended up needing considerable more work than I had anticipated
Granted, they weren't TERRIBLE, but they definitely weren't as flat as I had anticipated. But after a few hours on each door, I was able to get them to the 90% mark again. I will probably need to do another light skim coat by the handles, but otherwise they're looking pretty good.
With the doors finished, I then changed my focus to the roof. This panel didn't seem that bad, but had a few dimples/divots in it. The majority of what I flattened was actual waves in the sheet metal itself and had nothing do do with a dent or anything. So what started out as what I thought was one or two little dimples...
Started to grow and grow...
But after some loving w/ the block sander again, it resulted in a lot less than filler than it looked like from the picture above
Once the roof was done, onto the trunk lid I went! I made the decision to shave the rear "spoiler" in lieu of a more aerodynamic wing for down the road (help the back end stick a little better at the track). This was another one of those panels where I could have sworn only had one single dip/dent, but as I ran my hand over the panel it too suffered severely from vast waves across the flat surface. So much so that pretty much the entire lid nice a light skim coat on it. Not terrible, but sort of scary looking when you see it. And par for the course, I sanded off ¾ of what I put on. Still learning, though I've gotten a LOT better over the past year of doing this... lol
At this point, the car was starting to look more and more like a car again! I got the front doors flat and then installed. Then got to work on the front fenders! Luckily, they didn't require nearly as much work as the rear fenders after the grafting job I did. Slowly but surely, it's coming together:
And once I got everything good and flat, after following some advice of those much wiser than I in regards to body work (thanks again Ken - Mentosman42 and Hadyn!!!!), I picked up some Rage Extreme filler to do the final filling at the crease where the fiberglass fenders meet the sheet metal. Obviously, these due to the different material properties, the flare is going to shrink/expand at a different rate than the steel. That on top of the typical body flex this car is going to see when in use, the hopes are that this filler helps mitigate any cracks in the paint forming at the junction. It's good in theory at least, here's hoping it actually works!
After a lot of final sanding, I was happy w/ how everything was looking, and the time came to reassemble the `ol girl and get her closer to being back together!
When I bought the bumpers from Martin, the front core was separate from the skin, and the rear was holding on by a thread due to a bunch of missing clips. So when sanding, I separated everything with plans to get new OEM clips to reattach. Unfortunately the clips I ordered, while supposedly the right piece according to the ETKA, weren't even close to working. Thankfully, a quick look through McMaster-Carr and I found what I needed. They aren't quite as big as I'd like, but they're holding the shells to the core support and show no signs of coming off:
At this point, for the first time for just shy of a year, all panels and bumpers were installed back on the car! I finished up around 1am on Saturday (after coming back from Carlisle) and had to fight every fiber of my being to fire the `ol girl up and pull it outside. Figured I didn't want to make enemies with my new neighbors considering they've been rather excited to see me working on cars, etc in the garage!
But w/o much further delay... the final... unprimered product!
To say that I'm stoked is an understatement. Car is really coming together! There's still a bunch of small touch-up stuff I need to do. Next step is to tear the car down again and do final cleanup on the fenders and doors. Then out comes the sandblaster so I can clean the surface rust off in the tight spots and prep it for primer!
Game plan is I'm going to primer the `ol bird myself in the next month or so. Time is kind of tight, but hopefully will be able to make some headway! Once primer is done, will be carting it off again to a body shop and let them spray the color. Also have a few other treats for the `ol girl, but figured I'd let that wait a little longer as a surprise
That's about it for now... hope you enjoyed the show!
Oh, and more proof that I probably have $100+ of body filler on the floor of my garage that I've sanded off
-
Draky
Re: Justin's '85 4000 20vt Project: Got sex'd by an UrQ?
Wow! I love the flares!
-
nismo
Re: Justin's '85 4000 20vt Project: Got sex'd by an UrQ?
How many $ worth of filler have you inhaled?
Eric
Eric
-
Quattro v1.0
- Posts: 405
- Joined: Wed Feb 27, 2013 11:08 am
Re: Justin's '85 4000 20vt Project: Got sex'd by an UrQ?
Way to go Justin, thanks for the update!

Re: Justin's '85 4000 20vt Project: Got sex'd by an UrQ?
This looks awesome! Nice work!
Darin
1989 80 20vt
1989 80 20vt
-
JonathanL
Re: Justin's '85 4000 20vt Project: Got sex'd by an UrQ?
Unbelievable build. Read the whole thing
You've put in so much time on that for body you better stay far away from those tire piles
You've put in so much time on that for body you better stay far away from those tire piles
Re: Justin's '85 4000 20vt Project: Got sex'd by an UrQ?
thanks all! And Eric, next to nothing. I wear a ventilator the entire time I"m in that garage bay. Starting the car caused a literal dust storm from the open turbo and exhaust It's def not safe for breathing... lol.
And yeah, no plans to get near any tire walls at this point, that's for sure. Still have the temptation to pull molds off the flares, but honestly I'd never use the car if that were the case. We'll see what time brings me.
And yeah, no plans to get near any tire walls at this point, that's for sure. Still have the temptation to pull molds off the flares, but honestly I'd never use the car if that were the case. We'll see what time brings me.
Re: Justin's '85 4000 20vt Project: Got sex'd by an UrQ?
nice!! can't believe we missed each other at carlisle...I didn't know you were going! I expect to see the 4k there next year 
Ed
Re: Justin's '85 4000 20vt Project: Got sex'd by an UrQ?
Looks fantastic!
-Ben-
-1985 Audi 4kq: Xona 7164 AAN 488whp- -2009 Audi A4 -
-1985 Audi 4kq: Xona 7164 AAN 488whp- -2009 Audi A4 -
-
nismo
Re: Justin's '85 4000 20vt Project: Got sex'd by an UrQ?
Pull molds, then you can always sell copies!
Eric
Eric
Re: Justin's '85 4000 20vt Project: Got sex'd by an UrQ?
yeah, had looked around for your car, but figured you were still at the dyno. Didn't have a chance to walk down, though wanted to talk to Marc as well about tuning on the 'ol bird once I get the Ic ECU hooked up. I was there for 2-3 hours then headed out again. Was a short visit, though long enough to turn my arms and neck bright red!!!EDIGREG wrote:nice!! can't believe we missed each other at carlisle...I didn't know you were going! I expect to see the 4k there next year
-
Draky
Re: Justin's '85 4000 20vt Project: Got sex'd by an UrQ?
While a great idea because if I had a 4k I'd definitely buy them, I wonder how many he could sell as the number of 4k's out there is getting smaller.nismo wrote:Pull molds, then you can always sell copies!
Eric
Re: Justin's '85 4000 20vt Project: Got sex'd by an UrQ?
Price dependent and budget dependent I would love to slap these fenders on a notch back type 85. Then convert it to Quattro.
-Ben-
-1985 Audi 4kq: Xona 7164 AAN 488whp- -2009 Audi A4 -
-1985 Audi 4kq: Xona 7164 AAN 488whp- -2009 Audi A4 -
Re: Justin's '85 4000 20vt Project: Got sex'd by an UrQ?
looking awesome
24v-VR6T-CQ BEAST http://www.theprojectpad.com/viewtopic. ... 193#p37887
16v-ABA-T VEMS O1E ETC 4Kq http://www.theprojectpad.com/viewtopic. ... 201#p38264
16v-ABA-T VEMS O1E ETC 4Kq http://www.theprojectpad.com/viewtopic. ... 201#p38264